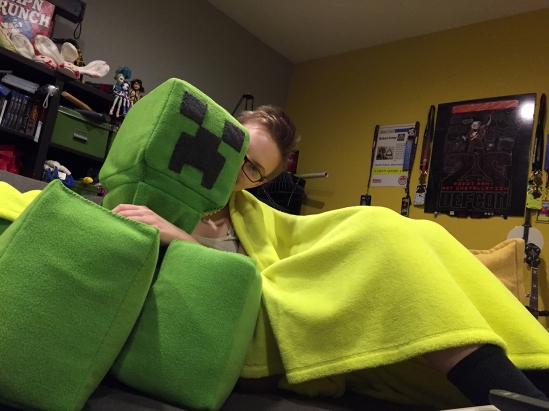
There comes a time when it is more important to pour hours into your offspring’s Halloween costume than your own. This was the year that happened to me. As it was Noodle’s first Halloween, I decided to make him into a huggable creeper from Minecraft… so he could steal all the hearts with his cuddly adorableness.
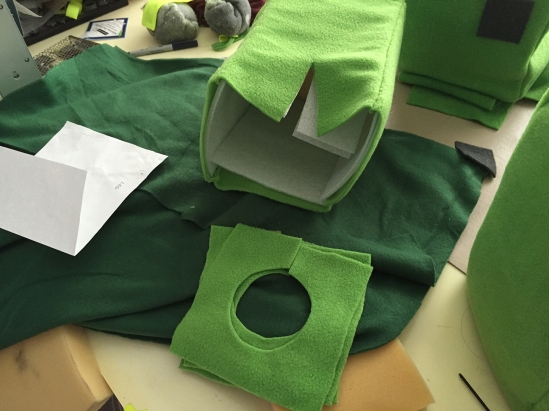
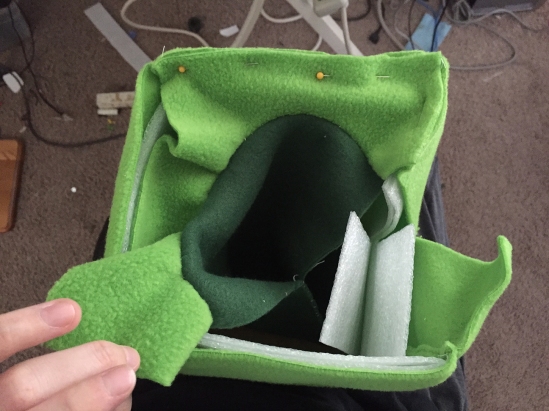
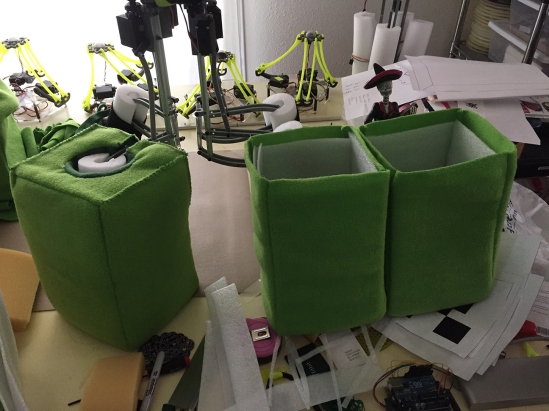
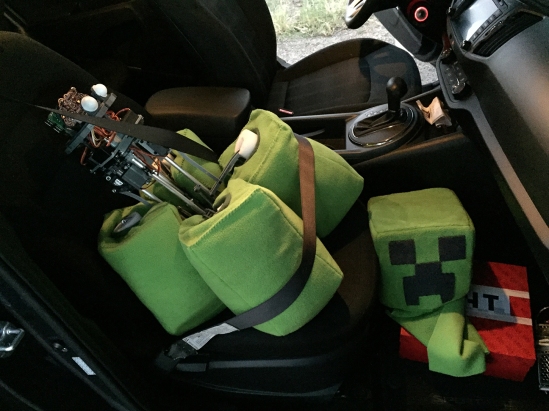
I spent over a week hand sewing this little number together from soft fluffy fleece. It was surpassingly time-consuming to make each of the four cubic creeper feet booties that slipped snuggly over Noodle’s noodles. I designed them with clearance slots so they wouldn’t obstruct his ability to move. Noodle was the happiest… 😉
I took him out a little during the weekend to make sure he got proper exposure… but wasn’t quite ready to actually let him try to trick-or-treat on the street.
His creeper feet were so wide that he was more or less safe from falling over, so I coded some quick creeper behaviors to animate him a bit. I wasn’t quite able to figure out the appropriate “creeper walk” motion, but I’ve decided to take another stab at it soon. Until then, you can see him wiggle here:
Throughout the month of October I had been preparing for the HackaDay SuperCon. I gave my first talk on designing kinetic things as characters. Noodle was my primary example, so I made sure to finish up a few of his functional quirks in time for the conference. One such feature was his beeper paired with the accelerometer sensor.
beeper + accelerometer = panic voice
This enables the behavior of calling out whenever noodle accidentally tips over. Kinda like a real baby! Every time you pick Noodle up and tip him in a direction past a certain degree, he beeps to indicate so:
I hope he doesn’t ever complain about his childhood sucking.
NoodleFeet finally took his first few wobbly steps a couple of weeks ago. I’m so happy to have finally wrapped my head around a walk cycle that works in spite of his obvious physical limitations; wobbly joints, weak motors, and top-heaviness.
Now that this milestone has been reached, he can no longer remain in his weak proto-form any longer. Noodle must grow to become the powerful little leg-hugging monster he was always destined to be. PHASE 2 BEGINS!!!
The most important upgrade I needed to make was to his brain. A custom PCB would replace the current Arduino and allow Noodle all of the other behaviors and abilities he would like to have, such as beeping, balancing, and of course… actually seeing!
With help, I tossed together a fully loaded board sporting an ATMEGA328 that houses the potential for all of those systems, and will also connect to a Raspberry Pi when I’m ready to dip my toes in OpenCV (Noodle’s ability to see and comprehend what he sees). Not only is this new Noodle Brain far more capable… it also looks sufficiently Noodle-some too. I completely embraced the “curve” trace tool. (It’s ramen-esque! – heh, get it?):
Also about two weeks ago, I applied to give a talk at HackaDay’s first SuperConference in San Francisco. I proposed to tell all about my process designing and building mechanical forms that are inspired by character illustrations… (with Noodle being my primary example)! I’m excited to say that I was accepted. I have a new thing to look forward to this fall; it will be my first talk ever 😉
Any how, all the more reason to do some more upgrades to my Noodle child! Upon making my travel arrangements for San Fran, I also ordered a full set of high torque metal gear servos to replace the so-so resin ones that he’s made do with so far. This ultimately involved completely dismantling Noodle. Knowing he wouldn’t like this, I made sure to take out his old brain first:
When my fabs arrived, I quickly soldered one up and installed it this week along with the Raspberry Pi (attached to the back of the brain):
Noodle as he stands now, has the power to punch through walls with his feet, the ability to balance, beep, and eventually see- once the raspberry pi camera module arrives from SparkFun. Here’s a video of the first wave of upgrades taking place:
I can now return to honing his walk cycle… so that he’ll be a bit more mobile for the SuperCon next month. It’s quite possible I’ll still be replacing some of his plastic parts to remove more of his new-born wobble… but we’ll see.
( ! ) TEASER ( ! ) My next post will cover preparation for Noodle’s first Halloween ( ! ) TEASER ( ! )
I would like you to meet my toaster. The toaster is an old character of mine who has survived through subtle reference in the things I draw and build. Nothing I make is about the toaster, but the toaster is about everything I make. He’s my chrome totem.
While I was in college abroad, I bought an actual physical model from the early 30s off eBay which looked pretty much identical to the one from my doodles (still works too!). I had big plans for this little toaster, but at some point we got separated during my move back to Las Vegas.
The toaster got packed in one of my friend’s moving boxes and it wasn’t until this summer that we finally remembered to unearth him for me to take home. After three years of waiting, toaster is now happily sitting next to me on my bench…
It’s wonderful to be reunited, but admittedly it feels weird talking to him during the day without a set of eyes to look into. So… I decided to fix this.
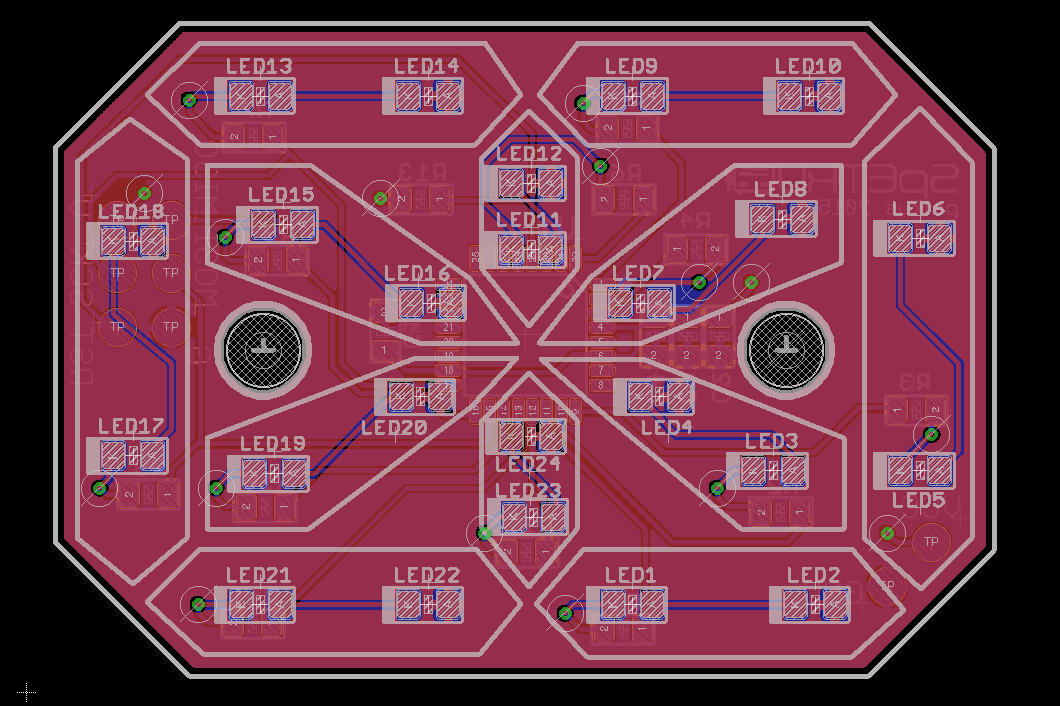
Not just any eyes will do either. They have to be capable of showing a multitude of expressions, particularly the sly and judgmental sort. Instead of using an LED matrix to form shapes, I thought it’d be a bit cooler to make my own modified segment display. Once turned on their side, a standard twelve segment display is capable of showing not only numbers, but all of the expressions a toaster might make too!
CUSTOM BOARD MAKE!
Again I took to Eagle CAD and prepared a board which I’ve called, “EYE OF TOAST”. You can see where the segments are- and where the LEDs will be installed.
3D PRINTED EYE FIXTURES
While these boards were off being fabricated with OSH Park, I worked on designing the fixture piece that the board would sit inside of. It would need to be as thin as possible, yet also able to defuse the two point sources of light in each segment… this took a few revisions.
My first prototype was a dual extrusion piece (the two-tone ones). These worked alright, but the white obviously stands out a bit too much when the segments aren’t in use.
I printed another solid gray fixture with a seamless .5mm layer on top, so that the light can pass through just fine, but when the LED is off, it disappears (bottom left). This was our winner.
THE MANY EMOTIONS OF TOAST
Additionally, while I waited for the boards to arrive in the mail, I brainstormed what the actual emotions would look like. I printed out a sheet of paper filled with pairs of segmented eyes and started coloring them in, just like an assignment in kindergarten. It was amazing how many different expressions I was able to muster from these 24 lines!
Once my happy purple envelope arrived, I got busy soldering all the tiny bits in their proper place. Since there have been a lot of ATMEGA328s floating around my life lately, this was the chip I decided to use for this project. So, I’ll be programming in the Arduino environment also.
PROGRAMMING ARRAYS!
I learned all about arrays for this project… which Mark held my hand through (and at times told me to step aside so he could just get things working).
Once I made ints for all of the expression I drew up on my toast ‘homework’ sheet, I could then call them easily in my sketch without having to type a bunch of numbers each time. The function I’m adding to the toaster is that he cycle through expressions every time you pull down on his lever. So, we added a switch to the code as a toggle button.
TOASTER SURGERY
After the code was tested and finally working correctly, the next step was to install everything on the actual toaster itself… which is where things got a little scary for me. I decided that this wasn’t the time and place to cut into toaster’s pristine shiny casing in order to permanently install the eye fixtures. Instead, I’d be attaching them onto the surface of the casing. Less cool, but less risk.
This meant I was going to need to run wires from the eyes on the surface into the guts of the toaster wherever the power supply was going to live. I decided on using a USB rechargeable 5V battery; one that is flat, slim, and can easily slide into the toasting chamber like bread.
I would also need to install the limit switch somewhere along the moving parts of the lever, yet preferably in a place that isn’t visible from the outside.
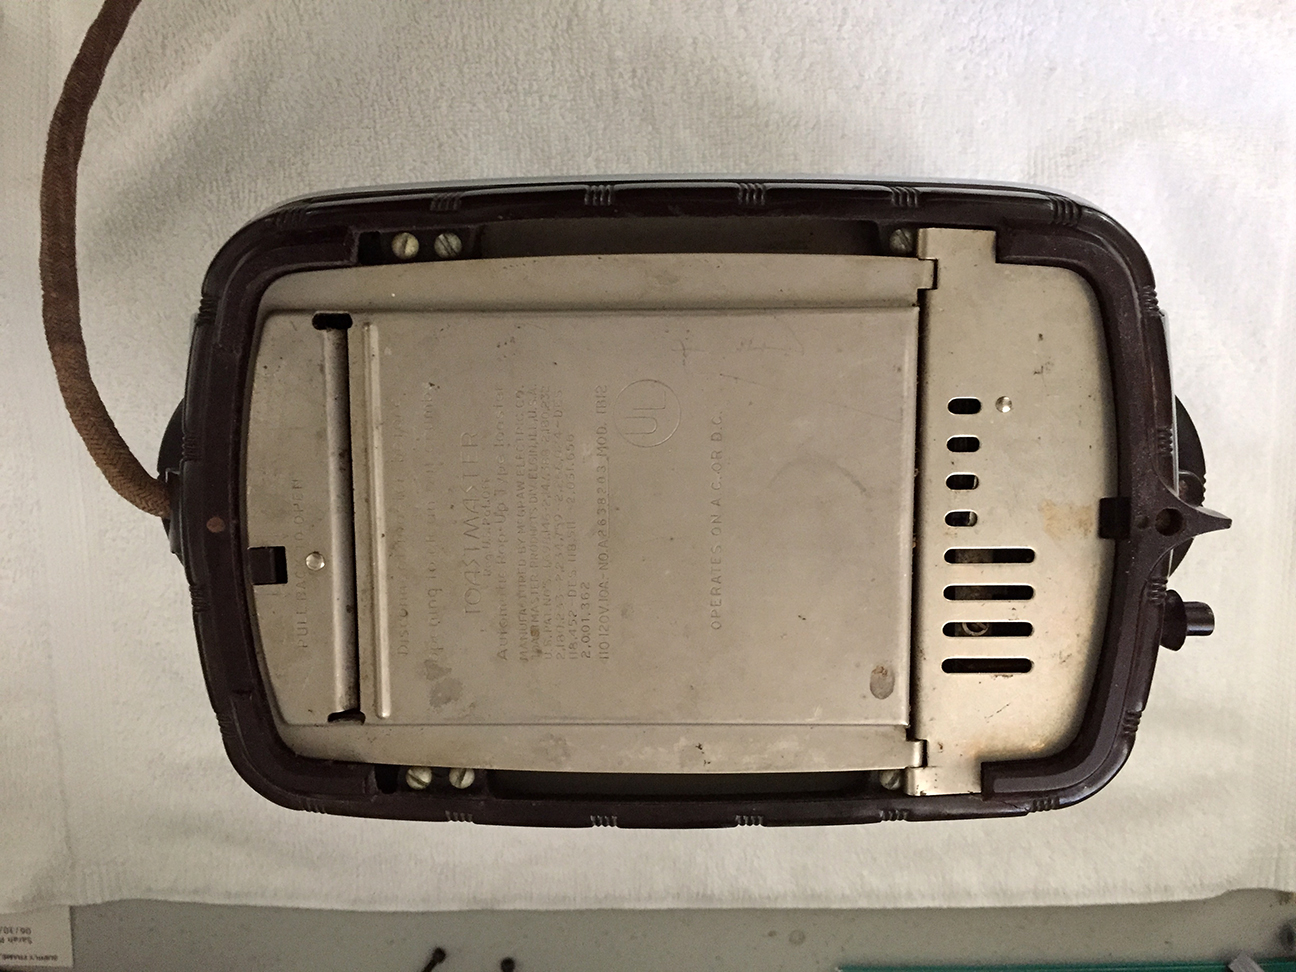
For the internal installments, I prepped a soft and well lit area for toaster’s opening and began my descent into century old crumbs and rust.
The first layer of defense wasn’t too hard to break through… it was held on by some screws:
Once the “crumb guard” was off, I was able to remove the plastic ring around the bottom of the casing:
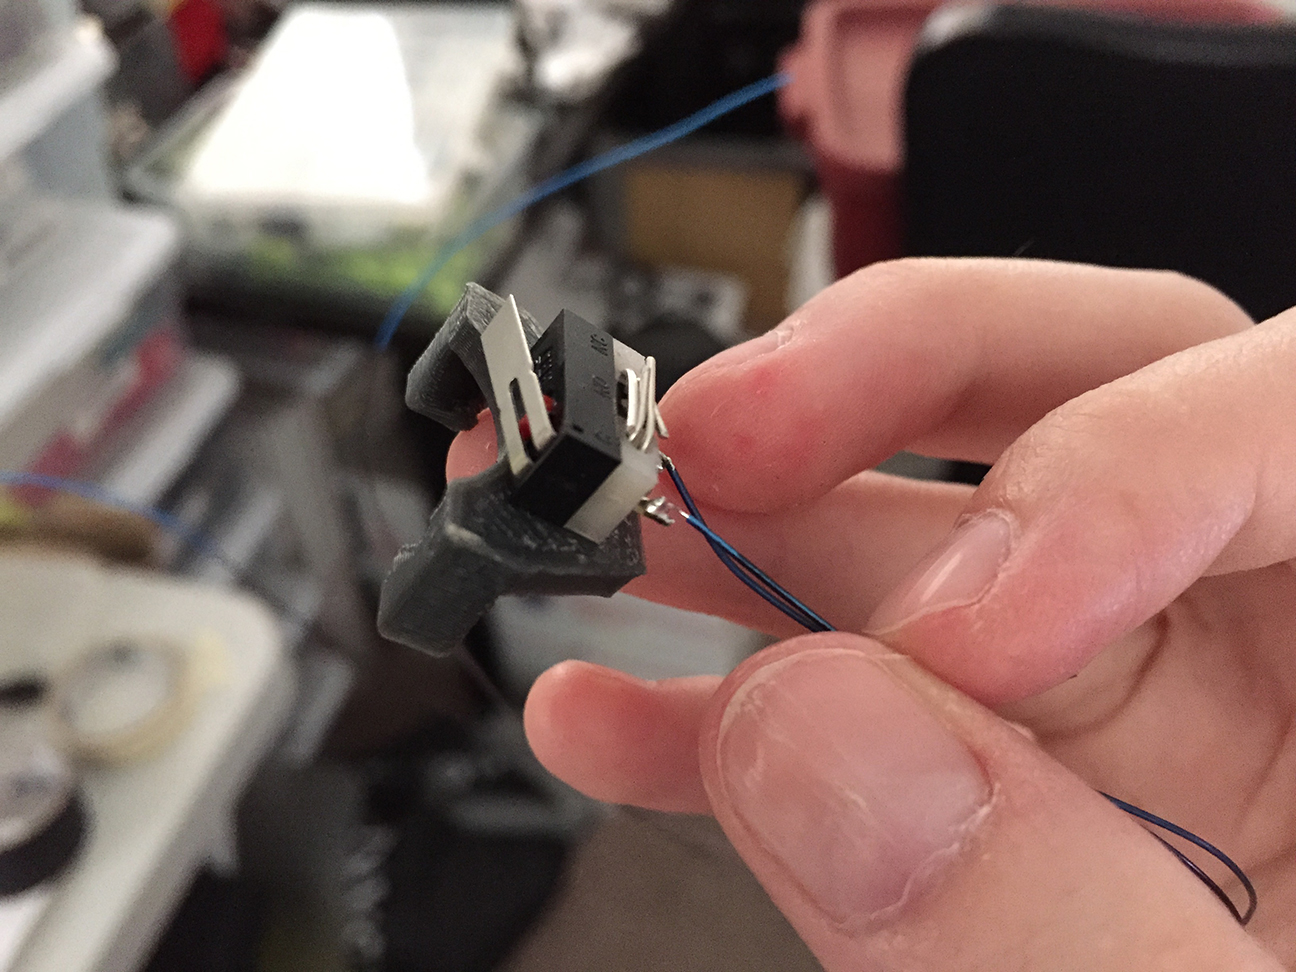
At this point I already found a possible location to install my limit switch. It was near this lever bit in the middle that had some motion, yet not so much motion that the switch may be missed completely or dislodged.
I designed and printed a little bracket to clamp in place between the two bread slots:
Here it is installed. The lever actuates just enough to press it:
I could have been done at this point… but some part of me wanted to get the rest of the toaster dismantled just because. ANNOYINGLY there were a few things in the way which were preventing me from removing the chrome outer shell from the heating element inside. One of those things was the toaster’s plastic lever arm, the other was his twist knob. They were effectively pinning the casing to the guts within.
The plastic arm on the lever was easy enough to detach as it was held on with a set-screw. The twisty bit however appeared to be press-fit in place and impossible to remove… which was bad pizza. It took an hour of careful twisting, pulling, and fondling before the age-old grime crumbled loose and we discovered there was a pin on the end of the knob that could unscrew. Once we finally figure this out the case slid off with ease (and allowed a bunch of others piece to fall out of place-heh):
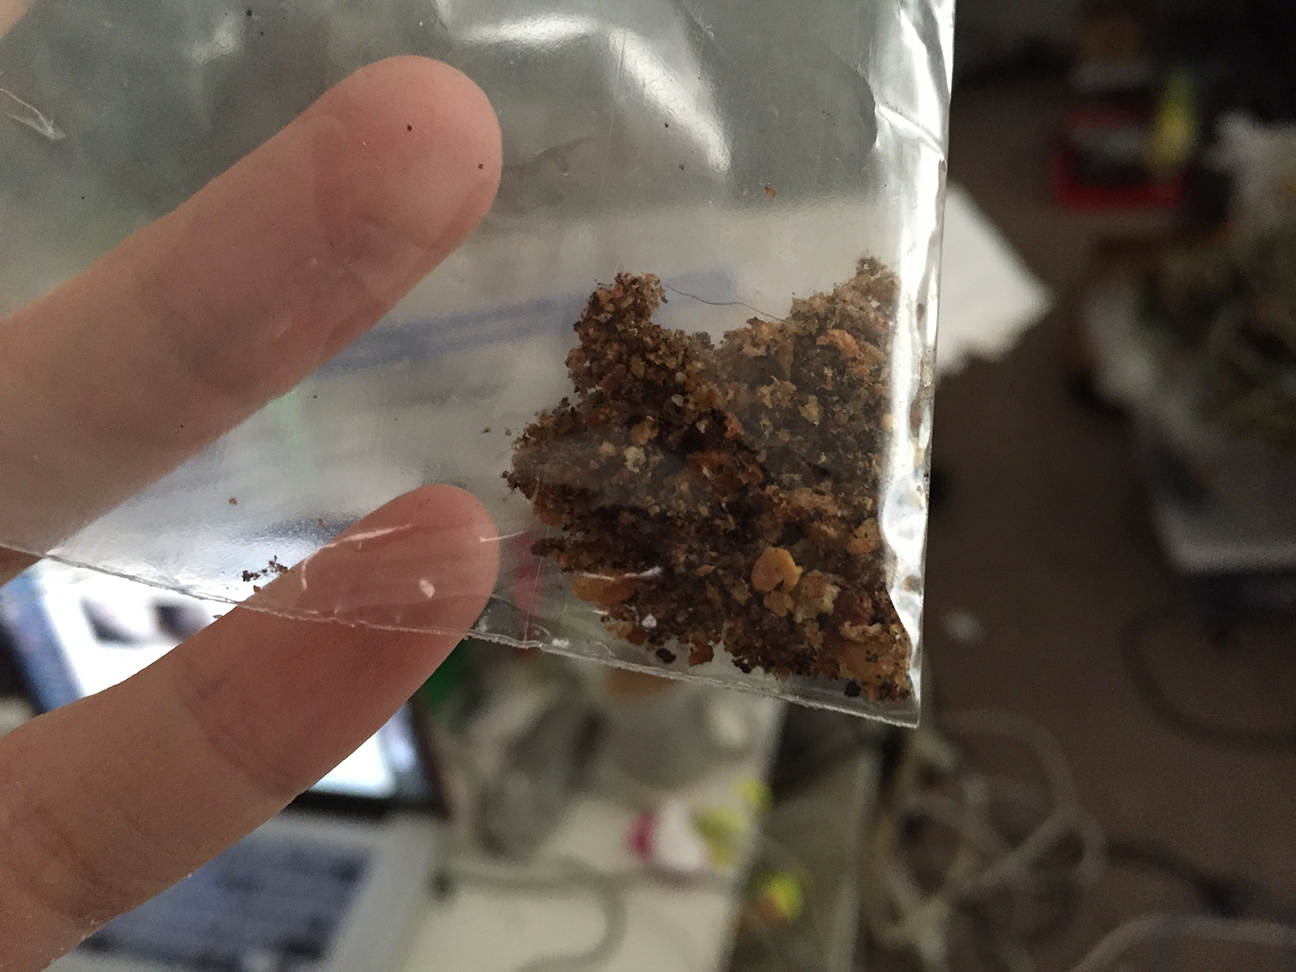
From this point on, toaster got to watch me perform a deep cleaning on the rest of his insides, which were caked in rust and chunks of buttery, burnt bread crumbs.
I took care to save all of these crumbs that I removed in a little plastic baggy… as I believe if you are a hundred-year-old toaster, your bread crumbs are kinda like your soul. Besides, I’d have felt bad discarding crumbs that have survived in this world three times longer than I have.
After a nice cleaning, I put everything back together… which was A LOT harder than taking it apart. Nothing wanted to slide into place quite right and there were also these long steel pins that came dislodged from the inside, which I had to re-thread with a pair of players and a flashlight. =/ In the end though, I got him back in one piece with the wires to his new augmentations ready for hookup:
The last step was to measure, cut, and solder these wires to their appropriate pins on the eye PCBs. Afterwards, I added little squares of double-sided silicon tap to the back of the eyes and stuck them onto the casing:
I carefully added a thin ribbon of gaff tape along the seam where the eye fixture meets the chrome as to seal off any light from leaking out:
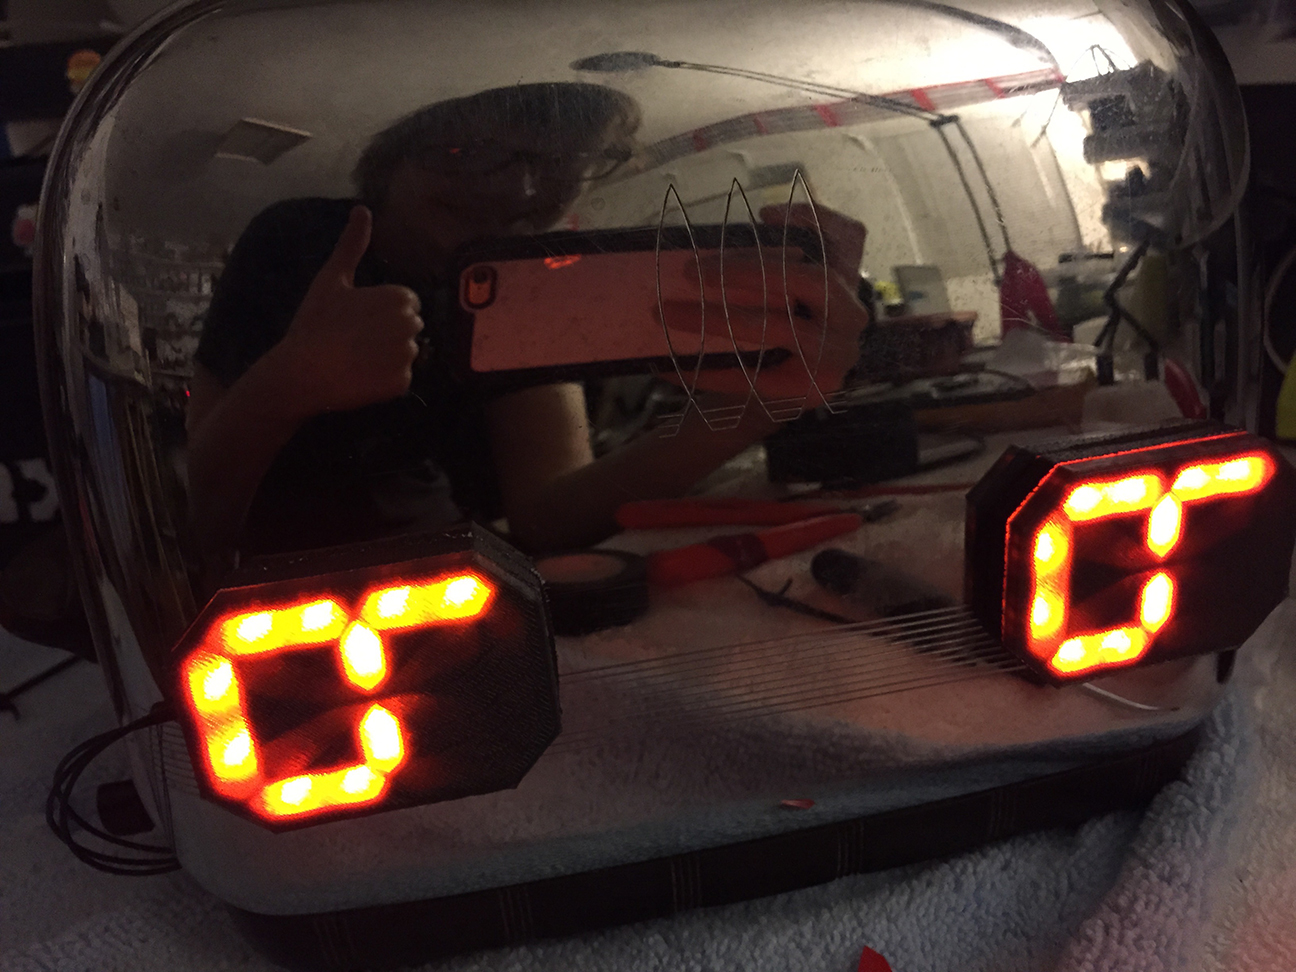
TOASTER has never looked so happy or sarcastic! I was relieved to see that everything worked as expected once he was plugged in. The switch I installed functions perfectly and the expressions have just the right effect.
I’VE COME TO REALIZE
Toasters are complicated little machines! I’ve seen toasters on sale for under ten dollars in ‘dorm essential’ sections of stores, and this feels shocking to me now. It’s true, they seem so basic and primitive… you press the lever, bread goes down, some heat happens, and then the bread goes up again. They aren’t channeling the entirety of human necessity like smart phones, and for that they are easily taken for granted. HOWEVER, there was a lot of engineering involved in the creation of these little mechanical devices that serve to warm our shitty bread without fail time and time again- and they haven’t changed much over the years. I believe there is a whole movie about this! WAIT- Yes. It’s called The Brave Little Toaster. I think I shall go watch it now for nostalgia’s sake.
As a child, that movie gave me my love of all inanimate objects. Once I saw it for the first time, everything on earth was alive. Cheers to that old seed…
AND hug your toaster next time you see it. It’s a work of art.
IF I WERE TO DO IT AGAIN…
…I would likely buy a new toaster that was designed to look vintage and permanently install the eyes in the casing itself instead of just adhering them on the outside. I’m willing to bet that a newer model would be made of a thinner metal, thus easier to alter, unlike my classic toaster’s blasting shield of a chassis.
There was also the idea of cutting micro holes for the light to pass through on the surface of the case so that the LED fixtures could be mounted inside. This would make the toaster look completely unaltered when the LEDs are off, and when in use the chrome would appear to illuminate like magic (or the charge light on your Macbook).
IN THE END
Alas! Another physical manifestation of a creature from the graphite dimension! If you wish to know the back story of toaster, NoodleFeet, and all of the other things I build, check out my webcomic GravityRoad; ideas begin in 2D.
I’ve always wanted to produce a graphic novel, but I’ve tried and failed to keep the momentum up numerous times throughout my life. ITS FRAKKEN HARD. I’m not the best at drawing, but I like doing it… and at this point I’m good enough that I can crank out images without fussing over them too much. So I’m giving it a go once more.
The story I’ve chosen to tell is a cracked-out trip of an autobiography. It’s about the important events of my life, told through the dreams I had at those particular times. This is all mapped over a set of characters I’ve been drawing forever who live in a post-human word. It doesn’t make much sense unless you remember to think of everything as a metaphor… much like interpreting dreams, right?
For an additional layer of fun, I’ve only started illustrations after my second cocktail of the evening. This works to keep the storytelling honest while preventing me from getting held up over perfecting my drawings.
The project is called Gravityroad,which is a title I’ve used for a great many things. The comic was originally going to be called “Milktoast” as a nod to the story’s two main characters, also implying the drunken practice of drinking and drawing. Someone did eventually point out that “Milk Toast”… in its many forms of spelling is already used as a title for a few other comics that exist out there in the ether. So, as to clench uncontested domain, I switch the name to good ‘ol Gravityroad.
This is what I’ve been piecing together for a large chunk of the summer. It isn’t electronic, hackerie… or an actual robot… but the comic should explain the back story to most of the robots and gizmos I’ve made over the past five years (like Noodlefeet!). It is the spiritual history of all things Sarah. If that seems cool to you, or you just like seeing robot art, I encourage you to check it out. It is of course, science fiction flavored.
I’ve spent the last week learning After Effects. For someone who uses Illustrator on a daily basis, this feels a lot like discovering the magic hat from Fantasia. Among other things, AE allows you to turn a vector based 2D image into a fully rigged character for animation… and it’s even easier to do than you’d think.
I had the idea a while ago to make a series of videos about Noodle and his adventures to Mars… The original plan was that they would be stop-motion shorts, made with a tiny 3D printed version of noodle as the puppet. There is no better terrain to fake as the surface of Mars than our very own desert outskirts… but alas, it is HOT out these days. Even if I could handle the relentless sun (which I can’t because I am WHITE), the PLA that the tiny noodle is made out of cannot. So much for the stop-motion thing.
For scale (his eyes light up and his feet can hold AAA batteries to power the LEDs):
I still wanted to make the short videos, so I started thinking back to all the annoyingly complex animation software (like Flash) I’ve used in the past and decided to give AE another go. Since the last time I made an animation using After Effects, they added the puppet pinning feature. It allows you to animate a single layer image by creating a fancy deformation map inside of it that can bend and warp. This means, instead of needing to connect pieces on separate layers together through a process of parenting and careful organization of anchor points… you can just rig one happy image with some bones, and you’re ready to pose your character with cool jello-like properties.
This happened to work SWELL with noodleFeet, as he is essentially a creature of wobble wiggle nature himself. After a long day spent watching tutorials, I got off and running and managed to make my first animation last week.
I still intend to produce a few more of these, but we’ll see how far my patience goes. Though it’s easy to animate, it’s still time-consuming to do it right. Once I attempt to introduce physics into the mix, I may hit a wall… because I’m too cheap to buy one of the fancy addons you need in order to generate the effects of gravity. Bastards.
The best part about having animated noodle walking is that it actually may have helped me understand how to program real-life noodle to walk better. So really, this turned into practical R & D. Ha!
Enjoy getting to know my baby a little better. He is the feet.
I’ve been home for almost two weeks now from our Bay Area pilgrimage and life has pretty much reset. I rewarded myself by binge playing Starbound all weekend and partaking in other mindless immersive activities I’ve been too busy to enjoy so far this year. It was a nice break.
But back to work! I’m going to close this chapter by recapping our big adventure:
Over all, Maker Faire went firkin awesome! Last year = shitty location + loud tesla coils + high maintenance demo + no place to escape for peace and quiet. Since we had ample time to plan, we eliminated all these stress points!
TRANSPORTATION
Our project this year was three times bigger than before at 84 individual nodes, so smashing them in the back of Mark’s Kia wasn’t an option. We didn’t quite have the money to spend on buying our own permanent trailer either, so for this trip we rented one from Uhaul. Quite snugly, three stacks of four delta pallets fit like Tetris inside with the rest of our props and support material wedged around the edges. Add in a crap load of the giant plastic wrap and everything was tethered solidly in place. No sweat.
I had a drink before opening the trailer once we arrived because the freeway up the central valley was more or less one unending pothole from hell. Happily, in spite of the violent rattling, everything arrived just as it was stowed. (Stress test for the babies as well as mommy too!)
…And nothing melted either. We traveled on a cool rainy day… which was lucky because one of my fears was that the heat inside the trailer would exceed the low melting point of PLA and we’d have nothing but piles of yellow sticks upon arriving. >.<
SET-UP
With more to show, I figured it was worth requesting a larger central location away from the chaos of the tesla stage… OH, and barriers. We were pleased to have been assigned an excellent spot in the middle of the dark room that had ideal visibility. On top of that, we sorta lucked out because Arc Attack wasn’t even there this year… which means I didn’t have to wear my Ryobi headphones to keep my brain from melting.
From the get go… we engineered our installation to function as a fort capable of fitting two people comfortably inside. So when you look at these pictures, imagine me sitting on a stack of moving blankets with a table, fridge and laptop around me. That’s right, we made a DELTA ROBOT IGLOO. And it was the coolest part about our installation this year…
THE SHOW
Due to the fact that our installation was automated rather than interactive (and completely caged in by barriers), Mark and I didn’t have to babysit the deltas and actually got to walk the rest of the show!
Here is Mark’s tour of all of the neat stuff in the dark room this year:
Instead of having our robots run slave to a Kinect, which has only been grounds for trouble in the past… Mark figured out how to control all of the robots as light fixtures in a pieces of DMX software called QLC+. This enabled us to orchestrate ‘shows’ consisting of preset motion and light patterns that the robots would circle through all on their own.
As for feedback, who wouldn’t like a mountain of dancing robots with twinkling light? Our display went over pretty well with the attendees… and we had a couple of fun moments in the limelight getting interviewed by press and the like.
TEARDOWN
Once everything was said and done, we loaded the pallets up onto a pushcart, four at a time, and walked them out to the trailer in the parking lot (which expedited the deconstruction part). I was sad to see our nest get dismantled, but eager to get to the Bringahack dinner and have another drink.
This trip was infinitely less stressful thanks to some better planning and all the help we had from our friends. (Thank you!!!) I have great memories to immortalize through illustration over the next few weeks. I’ll also be posting about the fate of Noodle soon.
❤ Thank you for being with me on the summit of my shit mountain. It’s taken a lot of support and sacrifice from the world to pull this into reality for which I am extremely grateful.
Without ritual, life lacks meaning. Whether it be a drink every evening at 5 to celebrate the day conquered, or watching the playoffs each season to show pride for your hometown… the little things we assign significance to reward us with moments of privately observed fulfillment.
The last Sunday of April each year is World-Wide Pinhole Photography Day. On this one day, people take strange, unique and beautiful pictures with hand-made cameras and then submit one to an online gallery archive. When you think about it… this is a pretty frikkin awesome thing. Somehow every April thousands of people all over the world remember to try out their newest pinhole creation or photographic technique and then upload a single image to represent an idea from their life on that day. It’s a collaborative snapshot of the world as a whole, and its become one of my life rituals.
I should probably mention that I hate photography. I hate it. I took black and white back in high school and never really grew to love the process. There were too many variables, too many smells, and at the end of the day… my self developed images just didn’t look interesting enough to warrant all the fuss.
So why is this different?
Long ago… when I was still a young college beast, I crashed a number of my friend Keith’s art classes one semester. Regardless of being enrolled or not, I decided I was going to do all of the projects he assigned particularly if they were things I didn’t think I’d like doing. Building a pinhole camera was at the top of that list for me.
Along with the rest of his class, I built myself a Populist from a cereal box, loaded it with film, and started taking arbitrary pictures with it everywhere I went. By the time I got to the end of the roll… I came to really care about the exposures inside my crappy box, because they represented a journey I had gone on stitched together by blips of moments I’d otherwise have forgotten. When I dropped the roll off to be developed, I stressed myself into a ball hoping those memories survived and were more than a blurry over-exposed mush… mishandled by the Walgreens photo department.
The camera did work which made me happy, but that’s not what made the experience important. Some of the exposures didn’t turn out as I had anticipated. The ones I spent a lot of time eye-balling and setting up were less interesting than some of the ones I just took without aiming at anything special. A lot of the exposures overlapped and created weird effects that weren’t intentional, but awesome.
roll 2, spring 2010
roll 3, spring 2010
roll 4, spring 2010
Just as unexpected as my favorite pictures on that roll was the weird transformation that had occurred in my head while toting around my camera. I started out passive and by the end of the process really enjoyed the times I stopped to steal a moment in time. So much so, that when Keith boasted about pinhole day, I jumped on board and took a picture for the occasion:
roll 3, spring 2010
Since I led into this post talking about the importance of personal ritual I wish I could wrap up stating that I’ve been participating every year, – BUT the honest truth is that I have not. I have however taken the crappy box with me everywhere I’ve moved in the past x amount of years, knowing that one day it would live to take pictures again…
And this was the year. I had to remember how to load the thing with film and perform tiny bits of maintenance just to get it to work again, but I’m glad I did. It brought me a ton of joy to go through the motions of the forgotten pinhole ritual… and I have really awesome vintagey images of my robots! Now to decide which one to submit for the Pinhole Day gallery this year:
roll 5, spring 2015
Another cool thing I noticed was that many of my pictures from 2010 were of robots (I like robots), but they were of little stationary models and statuettes that I built. This year I took pictures of robots I’ve made again, but they’re REAL big kid robots that actually do robot things.
So, what’s it about to me?
Life often turns out differently than we were lining up. Sometimes in spite of careful planning, all is lost and there is nothing to show for your efforts… though occasionally, you get a happy accident that works out better than anything you could have schemed or organized. Either way, *and I’ll shamelessly quote Rush now*
…THE POINT OF THE JOURNEY IS NOT TO ARRIVE…
So find the meaning in everything you do while you’re doing it.
Exposures from last week (spring 2015):
deltas!
more deltas!
even more deltas!
so many firkin deltas
noodle
living room
work room
serenity
Exposures from spring 2010:
As a final note, I scanned my negatives on the same machine I used back in ’10. (Thank you, Keith!)
I’m tired. I will forever look at big art installations and wonder with silent reverence if there were two people at some point sitting on their couch at three in the morning assembling parts to the thing by hand.
Any how… WE’RE HALF WAY THERE! Two days ago everything came together at last. One by one we tested and plugged the new babies into their happy little nests. We even named a whole pallet after our favorite characters from Create TV, which we’ve had on in the background while doing a lot of the manual labor.
Long story short, Mark fired up his Netbeans GUI and everything just worked. With a little tweaking over the weekend we got the 42 little ones to behave more or less like we were imagining. Mark even figure out how to turn off the stupid thing in the Kinect example code that waits for a hand wave before tracking. This means, it will just follow any hands it sees all on its own. Wish we knew about this last year >.<
After our appearance at the Science and Technology Festival tonight, the countdown resets for the big Maker Faire in a little less than three weeks. We have another six pallets to ready before then… not to mention the challenge of solving exactly how we’re going to get a gang of robots all the way up to Silicon Valley safely.
Wish us luck or something. After May is over I’m going to curl up in a blanket with my soft delta and watch the hobbit… and I don’t mean Mark. 😉
The art beast is a monster that wears its own face as a mask. We’ve gotten acquainted over the years, but as much as I think I know it, at the end of the day there is something else underneath that I can’t see. So in reality, I still know nothing of art.
HEAD : I can’t find a damn semi-transparent mixing bowl to appropriate as Noodle’s noggin. So, I went with a plastic bowl I bought a while back because it was Robot Army gray and yellow. The size isn’t right, but tilted at an angle with his eyes poking out it looks a lot like a helmet… and I’m okay with that.
SHOULDERS : I went to the store with Mark yesterday and searched through all of the collars in the pet isle to find a replacement for his old harness which no longer fits around his new planetary gear assembly. There were many small kitty-sized bands with big jingly bells… but not a single one was in neon yellow. So I didn’t bother getting any.
In leu, I smashed noodle’s old harness back onto his gear box so that if needed I can still hook him into the leash hanging from the ceiling above the work table. It lacks a proper bell… but fashion is second to safety.
KNEES : I think noodle needs socks.
TOES : He needs socks because I still haven’t been able to locate some of those stupid squishy stress balls which I plan to halve and mount to the bottom of each of noodle’s feet. These should help give him some traction as he attempts to walk. Someone pointed out that the foam material of the noodle was just sliding on the smooth surface of our table which was why he didn’t get very far during his first test run…er- walk.
Any how… the socks will keep the bottoms of his noodles clean until they’re capped with said squishy foam balls… Because tomorrow I’m taking noodle on his first ever outing into the big wide world.
He’s far enough along to show off at this point, walking or not. Speaking of walking… here’s some footage of him taking his first steps:
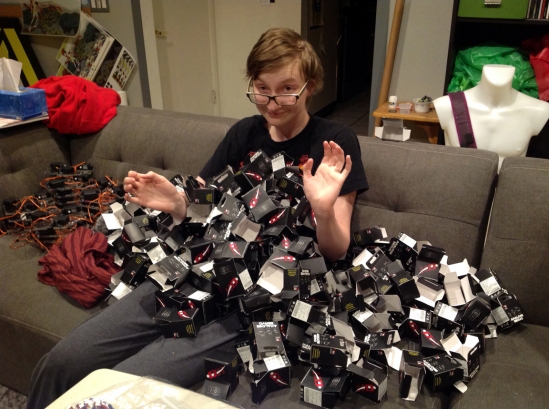
This past weekend Mark and I got a bunch more work done for the installation. We finished glueing and painting all the shiny black honeycomb pallets, so all twelve of them are now stacked neatly waiting to receive delta babies. …which means we need to build lots… and LOTs of delta babies. Thankfully, as I sit here and write this, that part is mostly done. For the past week or so the living room has transformed into a birthing chamber of plastic bins and Create TV.
At an average of 15-20 minutes a piece, we built around 50ish more base assemblies. That’s the acrylic bit with the three motors attached.
Obviously, they aren’t full deltas yet. They’re missing their snazzy yellow arms and blinky LED on top, but we wanted to get the hard part out-of-the-way first. The next step is to calibrate all of these little delta butts, and then screw all the grey paddles onto the gear hubs. >.< Which will also take a bit of doing.
Mark spent a crap load of time crimping custom cables which will tie the deltas together as one big happy collective consciousness. These will connect a series of relay boards to the individual brain PCBs of each robot:
So yeah, brains…. less exciting, I’m soldering brains again. Boo. With all the other cool things to work on, its monotonous melting all the same pieces over and over to blank PCBs… but alas, it must be done sooner rather than later.
As the brains are tested and flashed with all of the knowledge of how to be a good little inverse kinematic thinking soldier… we’ll be gifting each baby with a brain one by one, and then adding them to their shiny honey comb home to dance the mightiest robot dance.
I even squeezed out some new art which we had sent away to become postcards. We’ll be handing them out wherever we happen to show things at for the rest of the year. I say all of this tantric preparation does sorta feel like jumping out of a plane with a skirt on… so the image is appropriate. PROPAGANDA!