It’s Sunday night. There are just a couple more hours left before I go to sleep and my second week at ESA begins… In spite of it being nearly 10:00pm, the sun is still above the horizon shredding gold through the clouds here and there, and even making this killer rainbow chunk.
Last Sunday, I arrived in Holland. It felt like I was tied to an unstoppable force being propelled through uncertainty towards a heap of even more unknowns… which was exciting or terrifying or equal parts both. Once I made it safely to the *penthouse* I’ve been taking roost in (its on the top floor of the tallest building around, at 3 stories. perfect nest), I began mentally preparing myself for what was to come.
During the four days of my first week at ESA, I’ve had a good share of wonderful conversations with people who have had many inspiring life experiences and knowledge in areas that until now, I’ve known very little about. I’ve been getting acquainted and have been compiling my environment. I can now walk down the hallways of the building I call home-base and wave to most of the people now because there is some level of familiarity.
I feel kind-of like Annie arriving at Daddy Warbuck’s mansion. I’ve sat with a different crowd every day for lunch, had tea and coffee with those who were willing to share a few moments with me, and wandered around with aw-filled doe eyes while absorbing the initial pleasure shock of being in a new environment that has until now been merely an abstraction in my imagination.
Defining the Meaning in my Absurdity
Equally important as what I hear from the brilliant minds available to me, is what I end up saying to them about myself. With every conversation I start with each new person I meet, I’m in a position where I need to verbally illustrate what it is that I do and why. I actually get to hear myself explain Noodle, who he is and what his existence is all about. In the moment, my brain has to chisel out the words and commit to them.
The elevator pitch is a difficult thing to hone. Not only is the concept broad, much of the meaning beneath my work is an abstract “where my head is” sort of thing that’s the result of my life experiences leading up to now (and where I am in the moment). I can feel what my work means to me, but I’m not often needing to describe where the river started, or where I presume it’s going.
Since I obviously haven’t been working on prototypes, or CAD, or anything physical like I typically do, I’ve allowed myself to really think about all that philosophy hoo-ha that everyone hates artists for getting so “overly” gushy about (bats eyes).
It’s important to draw inward and exhale… and I’ve come to realize that’s what this journey is about. Instead of tirelessly pushing my face into the design- I must listen to others, observe the interaction and then meditate on the sparks that few off in the process.
Anyhow… I’m enjoying every minute of it ❤ I finished off my week by taking Noodle to the beach near our nest for his first big sand. He got to pretend he’s a strand beast =D
I was giving a talk at Hackaday’s SuperCon last Fall that actually had the term, “Tasting Feet” in the title. Because of this, I at some point found myself in a conversation with some other makers about whether or not my mechanical wonder feet actually did in fact “taste”, as I claimed. So sadly, I could only really conclude after some thought that they did not. (not that any robot can taste things quite like a human in the first place)
After admitting that my creations didn’t actually do what I enjoyed bragging about, there was some talk about how I could simulate the act of ‘tasting’ more effectively. Almost immediately, the idea of using litmus paper came up, and I think it has sat on the immediate back burner of my mind ever since.
This past week… I finally made what I can comfortably call, Noodle’s first tasting foot appendage… *cheers*
I am calling this installment the “sampling module”. If a litmus test and a cassette player had a baby, it would be this analog contraption.
HOW IT WORKS
The litmus paper is housed on a small reel and fed downward towards the bottom of the foot. There, a small segment is stretched parallel to the ground, so that a solenoid can push the tensioned portion downwards to make contact with the surface the module is resting onto of. Once the paper makes contact with a moist surface, the spent piece of paper is then fed back up into the foot, where a color sensor will read and log the result of the “tasting”:
(See video @ top for a more detailed explanation)
This is how Noodle will sample the world.
IN REGARD TO WHIMSY
After I published the video introducing the “litmus foot”, there were a few people out there who were concerned I wouldn’t get accurate test results from the litmus paper, because there is really no way I can keep the wet used portion of the reel from wicking into the rest that hasn’t… thus tainting my results.
I realize that. This really burns a special place deep within a portion of you out there… but the truth is, the accuracy of the test isn’t really important.
Again, the point of the module isn’t to be an instrument for testing the properties of liquid… the point is that it tastes…
So long as the mechanism functions as I designed it do, and a reading is taken, then we have successful tasting.
Think about it… It’s really somewhat of a nebulous inconclusive act, to describe how something tastes. At the end of the day, no matter how good you think you are at separating out the different flavor notes from one another; sour, sweet, umami- you are still under the constraint of describing your experience of the taste without any way of knowing how it compares to the experience of others. This disconnect is what interests me.
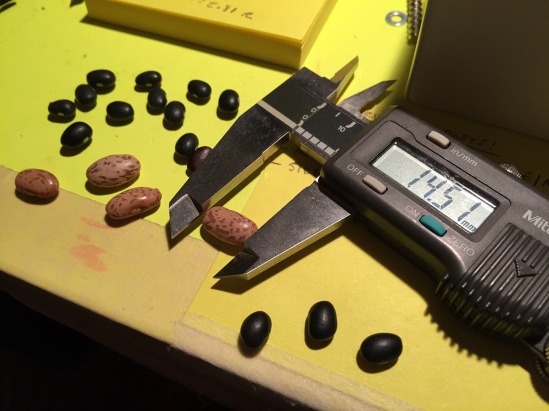
To make my point… Last month I got a bag of Jelly Beans to use while developing my bean planting module. I measured the dimensions of a small handful as references for the thing I was designing, but the rest of course, got eaten.
I didn’t just eat the whole bag of 40 flavors like some monster, however. I sat with my friend in the kitchen and for our own entertainment, we took turns blindly grabbing a bean from the bag, and trying to guess what flavor it was without having seen it.
This was a lot harder to do than you’d imagine. We ended up spiraling inward as we groped at whether or not we were sensing a fruity flavor, a citrusy flavor, or something else entirely. The act of identification seems at times, impossible.
BUT much like my module… the point was the act of attempting to parse what we experienced tasting, and then communicate to one another what that experience was like. That’s why I’m using litmus paper and clunky reels without any regard for results. It’s about simulating the act of tasting… not discerning definitively the attributes of what is being tested.
There is more to be said about doing this:
I’m in effect, stretching the accepted purpose of robotics in much the same way artists of the past challenged our expectations of a painting. Some decided that the human form (or any) didn’t need to be depicted realistically in order to be valid art. Just the same, I’m exploring robotics beyond the bounds of utility. My robots are still valid machines, even if they don’t provide useful work to a human.
I intend to demonstrate that a machine can have a purpose, it just doesn’t have to be a practical one. And I hope to show that in the circumstance where a machine’s purpose isn’t to serve in a practical way, it becomes less about what we get out of the machine, and more about what the machine is doing for itself. We are removed from its purpose… (which is something I think humans have a hard time wrapping their head around)
The behaviors I design for Noodle are meant to serve him as an entity; not for our entertainment or for our need.
This summer, I am once again diving into designing mechanical personality quirks. I’ll be investigating new and exciting ways for my robot, NoodleFeet to interact with the world. This time, my focus is the wet, tingly and preferential aspect of TASTE.
From now until the end of August, my goal is to produce four different tasting modules that each demonstrate some aspect of sampling or preference. You could think of them as the “four tasters of the apocalypse”…
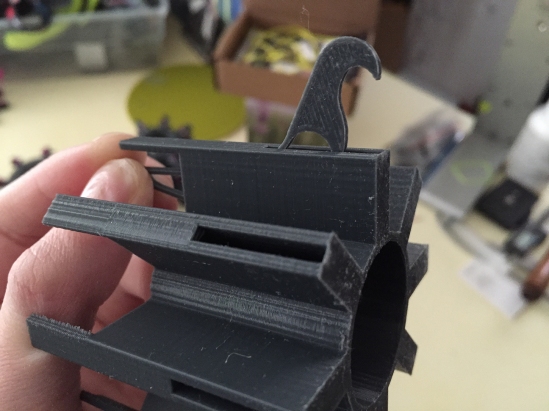
The project parameters are that each module must fit within a 3” x 9” cylindrical space (i.e. the size of Noodle’s foot appendage). For reference, the mechanical goodies I am to design must be housed inside one of these frames:
Bean Planting
The first Module that I chose to focus on will effectively plant a single bean a few inches below the surface it stands on. Why beans, you ask? Well, Noodle loves beans, of course. When he makes it to Mars, he’ll need to be able to propagate his favorite thing efficiently. Until then, he can practice planting on couch pillows, piles of laundry, litter boxes and the like…
This module will execute three different tasks in one planting cycle: CORING, DISPENSING, and WATERING
So far, I’ve successfully created a prototype that executes one of these tasks; the dispensing function, which is coincidentally linked to the aspect of housing the beans. To solve storing and delivering the beans in a controlled manner, I devised of a helical shape that is inspired by an archimedes screw… and also inspires thoughts of mint:
My candy cane hopper shape captures the beans in-between the threads and processes them upwards within channels that flank the spiral:
Once fully loaded, every time the helix rotates 90 degrees, it will carry one bean to the exit slot on the inside wall at the top. The bean will then drop down the hollow center of the helix and into the coring device below… (which… is next on my list to design)
This is the first assembly I’ve ever designed in Fusion360. One week into using it, I’m sad I didn’t make the switch sooner!!! If you’re considering doing so too, bite it and take the leap! Your life will be so much better once you do!
This mechanism that I dreamed up in my brain-meat a little more than a week ago, pretty much works after the first iteration. There is totally some things I need to tweak in order to make it work more reliably. However, it is doing what I want, exactly how I imagined it working.
Not bad for a first try!! =D
While I ponder over the next step, which is the coring mechanism, I will also begin CADing the next tasting module. Which? The one that involves litmus paper…
Sometime in April, Noodle started to change. He stopped hiding in his blankets and began spending his nights surfing through hardware catalogues alone in the darkness. He became curious about linkages, pivot joints, self lubricating thrust bearings and among other things, the prospect of being made of something harder. Noodle started dreaming of becoming metal.
As I mentioned in my previous post, just as I was about to tackle the conundrum of mechanical drooling… I went to JPL this June and met the mechanism that inspired Noodle’s gripping toes in person:
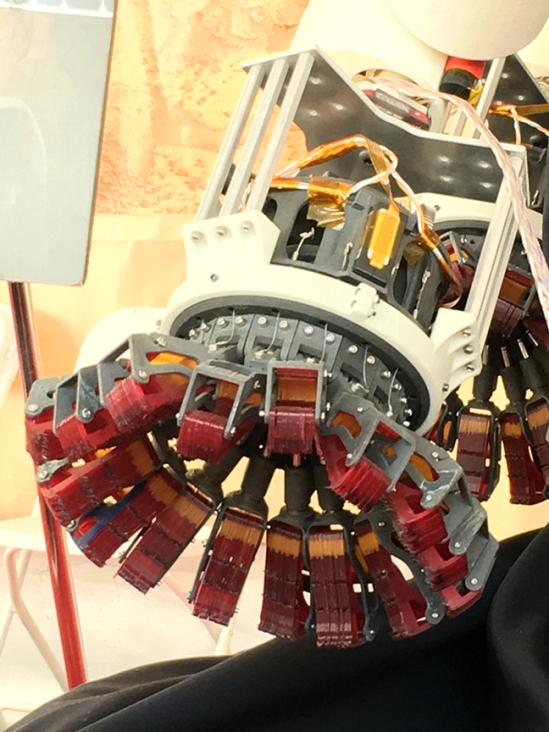
The LEMUR probe has easily a billion toes… all agile, long and barbed. You know by looking at them, that if it reaches for you, you aren’t getting away. I returned home feeling a tad inadequate. Noodle’s current apparatus with its 8 lonely toes did in fact look pretty sparse.
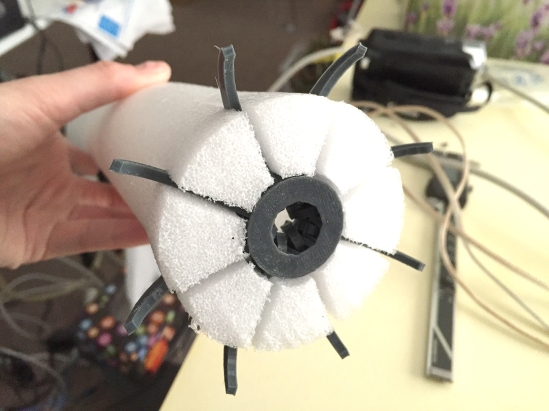
In the period of a weekend I managed to tweak my current design a tad and come up with this little wonder… which has exactly 16 toe filaments (that’s twice the toes!):
In order to attach that density of toe tendons to the toe-ring, I had to eliminate the use of hardware (which was kind of a relief). As improvisation, I threaded some 3mm rubber hose through the loops of the toe tendons to hold everything in place.
Of course, after I built the improved, maxed-out hyper toe apparatus… I’d have to once again install a servo motor and some gears to make sure I could in fact still drive the thing… (now that there is twice as much material making surface contact)
It took some stronger springs, but it for the most part *does* still work. The stronger springs insure that the toes retract back into the sheath quickly enough not to hook onto the rim and get stuck on their way back in.
I finally had produced a solid working assembly towards the end of June. I invested in some light gray and white filament, as well as the appropriate red for use on accent pieces and Noodle’s tiny toe-zies. The thing I had been working on was finally starting to look like what it was suppose to be, and Noodle liked this:
With one complete proof-of-concept to show, I set everything down and allowed myself to become very distracted with a whole slew of things (which is good). My life exploded momentarily and when everything settled back down about a month ago, I found myself looking at an opportunity to travel to Linz, Austria to exhibit something of mine at the ARS Electronica festival [!]
I’ve been wanting to venture to Europe for this festival my entire adult life, and wasn’t going to pass up the chance to bring my spawn with me to have a part in it. Even if he is weak and unprepared as an art exhibit, his presence was what mattered. With no time to stall, I made the executive decision to begin producing another 3 prototypes in order to complete a set of 4 tasting feet. I had a week and a half to do it; print close to sixty or so parts, make any needed design changes, assemble, test, and tweak code. bLAH. Looking back, I’m shocked I even attempted such a shit-storm of preparation when there was no wiggle room for the unexpected:
BUT… in that week and a half crunch, a lot of things got pushed through to completion. Nothing like a deadline to assist progress. (and) Luckily there were no surprises…
I’m grateful I had Mark and Tony to help wherever I needed aide picking up the slack. One glass of wine at a time, and one task after another, the new feet took shape and were installed on Noodle (mere hours before I would need to disassemble him completely for his long flight over to Linz in my suitcase).
The festival, ARS Electronica, was amazing. There is so very much I could say in regard to its content and scale- but to do so would fail to provide an appropriate picture. You should go yourself to experience it. If the median between science, technology, and art is your thing… you have nothing to lose. Not to mention, the city of Linz is a wonderful place to visit in itself!
For four days I left NoodleFeet alone at the mercy of families, Germanic engineers and machinists, to be poked and probed and boggled over as an oddity, robot, and art piece:
During this gauntlet he held his own, but Noodle did blow out a servo motor. Just as I was returning to my exhibit area to check in on Mark (who would periodically drop by to watch over the young one while I was away), I saw a nice white plume of smoke streaming forth from Noodle’s foot. Apparently they can’t quite handle hours of continuous use- so the toes are just that chafey.
But other than the initial matter of smokey toes, he didn’t catch fire, fall off the table, or get stolen. =] That for me was a success…
Now that it’s October… I can focus on the important matter of drooling. Drooling, leaking, salivating, moisture making… and the challenge of producing that special suck sound that has come to be synonymous with the NoodleBeast. The growing pains aren’t over Noodle. Be strong. Your day is coming ❤
In case this is your first time hearing about the project, I’d like to introduce you to the heir of all lint and space rocks, NoodleFeet:
Like his name suggests, Noodle is a “feet-based” mechanical life form who has been designed to taste objects (among many other things). Though Noodle has lofty aspirations for world domination, he is still a fledgling one-year-old… and his mommy (me) needs to work on equipping him with all the space exploration and world conquering super goodies he’ll need while on his journey. For that, he is in a state of perpetual growth.
My challenge to myself : I decree, each of Noodle’s robot feet must be able to grip onto surfaces with many small cherry-red toes so that a long central silicone tongue can dart forth and taste surfaces while expelling frothy wetness from a reservoir within. All three mechanical systems must work consistently, and fit collectively in the same 4″ x 9″ cylindrical space:
OK, SO… A LITTLE LICKING, AND THE PROSPECT OF DROOL… BUT FIRST GRIPPING:
About a year ago last Fall, I stumbled upon a video of a space probe developed by JPL, that was designed to cling to the surface of asteroids while drilling out a sample of rock. The probe was able to grip onto stone surfaces with hundreds of tiny micro-spines which branched out radially around the central shaft that housed the drill.
I was very inspired by this… and it became an instant decision that Noodle must have gripping toes of his own. Up until this point, his feet were in fact white pool noodles (which is where his name comes from). They were soft and light, but completely passive and somewhat boring for a dominating robot’s appendages. This obviously needed to change.
The magic was in the design of the individual toes themselves. All of the tiny hook-like toes were attached to a common ring by long flexible filaments:
The ring would need to be driven downward in order to force the toes through individual channels and out from slot-like sheaths. Finding a *good* way to drive the toes downward would become a bit of a challenge for me…
At first, I naively thought I might actually be able to use solenoids as a form of linear actuator:
I did a lot of design and printing, only to realized the solenoids are in fact pretty weak, and not ever going to have the ability to press against the force of my springs; at least not ones as small as I would need in order to fit in Noodle’s feet:
I eventually devised of a rotating cam with ramps that would convert radial motion into linear movement and press the tiny gripping toes downward:
After I proofed out the mechanism, I had only to add a servo motor to the design in order to dive it. At this point I needed to find a strong enough motor and remove as much friction from the parts as I possibly could. 3D printed pieces tend to be a bit bumpy:
With the toes gliding in and out from their sheaths all on their own, I would still need to figure out how to cram the other two (licking and drooling) systems into the same 4″ x 9″ space. Since it would need to overlap in some ways with the already present toe assembly, I decided to tackle the tongue and its actuator next…
The tongue piece is a silicone brush that I bought from Ali-Express China. It is some sort of baster that was originally attached to a squeezable bladder. The brush end is removable and has a single pore in the center for excreting fluid. PERFECT for when I add the salivating feature later on:
I tried for a day or so to come up with a rack and pinion system to push a spring tensioned tongue out the bottom of Noodle’s foot. Though it worked, it had a tendency to bind and wasn’t as reliable as I’d need it to be.
My mechanically inclined machinist friend, Tony is responsible for scrawling something down on a sheet of paper that I’d eventually design in CAD, and use in the final version of the foot. It’s a simple parallel linkage that fits nicely amidst the center of the toe mechanism and needs only a simple micro servo to actuate. Less is more:
At last, both the gripping and the licking happening in sync:
With the feet really starting to take shape, it was time to address the third and final function: DROOLING.
Just as I began thinking about how I was going to add the element of fluid to Noodle’s feet, I went backwards and once again became seduced by toes; the very toes that started this whole toe story.
At the start of summer, I ran off to Pasadena for JPL’s open house. There I saw the glorious multi-hooked gripping LEMUR apparatus in person… and I was reminded that though sometimes less is more, sometimes more is more– and in the case of toes, more is ferocious and mighty.
But… that is a story for another article. This detour of toes is a developmental universe in and of itself. I’ll be publishing the conclusion of this endeavor soon before giving a talk on all things tasting feet @ HackADay’s SuperCon this November! If you happen to find yourself there, say hello to Noodle and I. With any luck, he’ll be able to greet you with a sensation of wetness.
Sticking out from my toaster’s head like a crude antenna, is a classic lawn ornament, the flamingo I’ve come to call Carl. Unlike most of the other residents in the lab, he is not an electronic or robotic thing. It has been my intention since I brought him home last September, to liberate Carl from his static form to join the ranks with his mechanical compadres:
Carl’s fate is to become a ball-balancing robot… one with motors and wheels… that can balance… on a ball. If you’ve ever seen one, ball balancing robots are impressive as hell and fascinating to watch… because you almost can’t believe that they could work as well as they do! I mean, heck… I can’t even balance on the floor sometimes.
The first thing I learned upon researching these beasts, is that in order to build one of my own… I was going to need to locate some “omni” wheels to play with. Never having heard of an omni wheel before, I googled the term and found hundred of pictures of crazy looking shapes that reminded me of futuristic frisbees or saw blades:
So, they’re wheels with wheels. heh. They’re needed so the ball can glide freely in whatever direction the motors collectively force it to… like butter. Friction is bad. Binding is bad.
I ordered the smallest wheels I could find in two varieties. Surprisingly, for such complex looking shapes, they weren’t terribly expensive; about $5 on average a piece. While waiting for them to arrive in the mail, I started designing the “body” of the robot.
I came to learn that there are in fact a lot of similarities between the delta robots I’ve built in the past… at the three pronged balancing bot. At least, in that they both involve three motors working together mathematically to resolve a common point. Since they are both radial bots… I proceeded to use one of the delta robot’s acrylic bases as a mounting plate for Carl’s stepper motors.
Rather quickly, I printed some brackets on Monday:
Almost immediately after putting together this first base assembly, I drew what I thought I’d want the finished robot to look like… and saw in my own sketch that the assembly could be a lot more “talon-like” if the mounts of the motors branched out at 45 degree angles from a central point (instead of just being stuck to a big plate).
So… I started over. The hard part about making the new bracket design was taking into account while I modeled it, that one side must lay flat on the print bed >.< This threw my head in loops for a while, but I eventually hammered out a piece that worked…
By this time my omni wheels had arrived, so my next challenge was to figure out how to mount them to the gear shaft of the steppers. Sadly, the wheels came with no couplers of any sort, so I would have to print my own. =[
The shaft I designed would have to fit snugly in the center of the wheel
and also couple onto the gear shaft of the stepper motor by means of a set screw
This coupler took me fourteen- YES ( 14 ) ! revisions to get the tolerances juuuuuusssst right… the shaft inside the wheel fits tight but not too tight:
With the wheels mounted to the steppers, the assembly looks kind like a big chicken foot:
…which is what I wanted… BOCK!
At some point Thursday night… I pulled Carl from his metal legs and did the morbid task of marking his belly with a dotted line. Instead of doing the messy deed of severing his drum-sticks immediately, I got distracted and went to bed, leaving Carl nestled in Noodle’s blankie to suffer over night with thoughts of what would happen to him the following day.
Cutting the big oval around his little birdy nubs wasn’t at all hard… Once I drilled a starter hole, the thin blown plastic cut like paper with a pair of nippers. When I finished, I held Carl and told him everything was going to be alright…
Sarah soothes the legless Carl
I used Carl’s disembodied gams to measure how large the adaptor for his chest would need to be. The pipe which would act as Carl’s… leg… would mount at a 25 degree angle into his belly. Designing this part was not as difficult as I thought it would be. The actual pipe mount and belly adaptor ended up being two separate pieces (for ease of printing):
The screws that connected this fancy shape to Carl, went through his belly and met a plate of nuts set on the inside, clamping everything firmly in place (but this wasn’t easy to execute!):
There wasn’t anything to hold the plate on the inside of his body while I screwed into it… other than some tape, which kept coming loose and plopping down into the cavity of Carl… forcing me to start the process over again.
After a couple tries I got everything screwed on, and Carl felt a lot better about himself… so did my conscience:
On the opposite end of the pipe, I made another adaptor that connected to the motor assembly:
Once this was added, I put everything together and had this sexy looking bird before me. The essence of the flamingo:
Carl, el Robo Flamingo
Carl isn’t technically a “new” sibling… but now that he’s a moving robot, Noodle sees him as competition. Hopefully in the weeks to come they can learn to get along and share their living space.
Carl & Noodle, BFFs forever
The next step of the project is to wire up those steppers to some driver boards and start moving them. I anticipate that every piece of Carl will be redesigned and optimized in the near future to make way for the mounting of his brain… and power supply. I just couldn’t help myself from designing the robotic form first. To me that’s the fun part… =
Carl will also have his own presence on my personal site, zoness.com. So look for new bird art in the coming weeks as we dive deep into Maker Faire season.
For the past year, the four tawny stalks that NoodleFeet balances upon have remained common pool floaties, 2.5 inches in diameter, hollow, providing nothing more than the obvious support needed to function as legs… but Noodle longs for something greater.
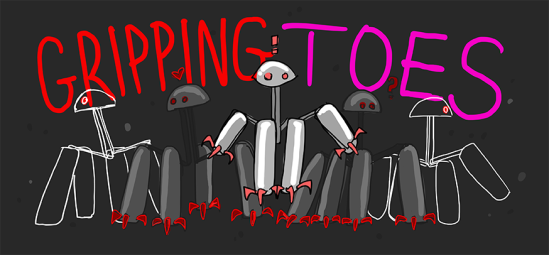
GRIPPING TOES
When Noodle feels threatened, there is little he can do to defend himself. He can beep and perhaps canter away at a slow speed… but he is passive and therefore vulnerable. He isn’t equipped to handle the harrowing task of world domination::cough:: I mean, daily life. To fix this, I decided to add another layer of complexity to Noodle’s most important characteristic: RETRACTABLE GRIPPING TOES for his feet.
A while back, I came across a video of a rock drilling probe concept by JPL. This neat claw attaches itself to a surface by splaying out a hundred or so mini grappling hooks in all directions, which catch on the rock and help anchor the central cylindrical drill in place. I saw this and thought to myself… Noodle needs four of these, as shoes.
Like a good mother, I started brainstorming how to create said shoes. Originally I designed long claw-like toes that rotated out and back, sort of like switch-blades:
They fit into Noodle’s original 2.5″ diameter noodle material, and even added stability… but there wasn’t enough area to actually install any motors to actuate things.
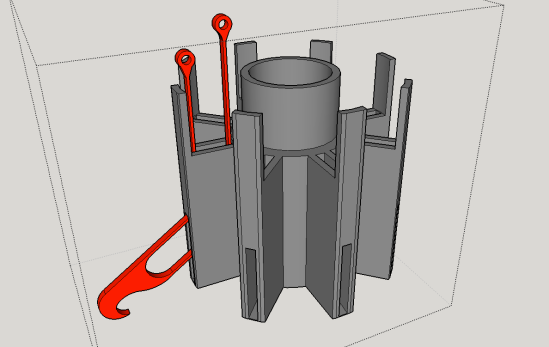
With a little bit of trial and error I rethought the whole design and came up with a solution that made use of 3D printed plastic’s flexibility. This new concept worked more like a cat’s retractable claw, and was similar to the drill from the video that had inspired me.
Each individual toe (in red) would be forced through a curved internal channel and out the side via two thin bendable “tendons”:
How The “Tendons” Work
An individual toe has two strands of tendon attached to the back. When the tendons are pulled in opposite directions, it causes the toe to torque upwards or downwards.
Why Do the Toes Need to Tilt Back and Forth?
If the toe goes straight back into the sheath the way it came out, it won’t unhook from whatever its currently gripping. Also, the tip of the toe will likely snag on the edge of the sheath on its way back in. To properly “detach”, the toe should arc upwards slightly as it retracts.
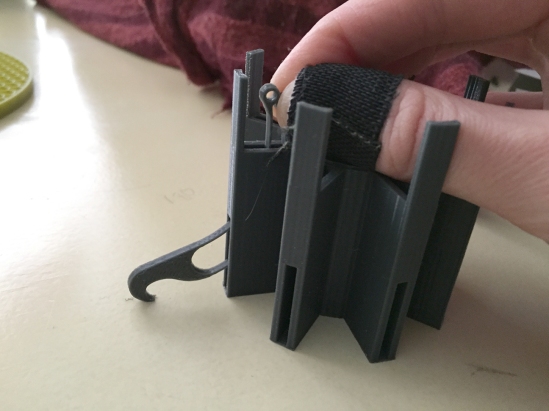
My first prototypes were designed to fit inside the 2.5” diameter noodle material. I was able to make it work, but it didn’t leave much room for the other future functions of his feet (his tongue):
In the end I really needed more space to fit moving parts and hardware. Luckily I have a noodle fairy living with me (Mark) who harvested a larger piece of noodle stock from a pile in his garage. It is 4” in diameter and offers me much more room to play around with! Plus, fatter feet will give Noodle more stability!
4″ PRO-TOE-TYPE 1.0
I tweaked my design for the new 4” material and printed my first prototype with a set of eight twinkling magenta toes (I haven’t ordered red filament yet).
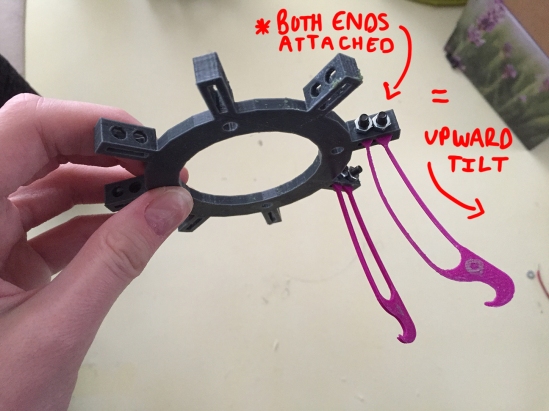
The reason for the tendons being slightly different in length is so that when they are fixed next to one another, it creates the needed outward/upward tilt:
(so, this is what a toe flower looks like):
I originally planned to connect both tendons of each toe to a common ring piece (above). When the ring is pushed downward towards the sheath, it would force all of the toes through their channels and outward at the same time. I also added a spring and guide rod (a long screw) below the ring to push it up again once downward force is removed:
The first complete 4″ prototype worked more or less… It certainly passed the “carpet snagging” test:
I learned right away that I couldn’t actually connect both tendons to the same ring and run it through the inside of the sheath without it binding (which now seems pretty obvious). The only way I could get the above demonstration to work was if I left the longer set of tendons sticking out freely, attached to nothing… so that the toe has no preset angle bias as it attempts to travel through the channel:
However, in order to make it work at this point, all the little purple pieces sticking out had to be pressed down together at the same time first, or else everything would bind up and destroy itself.
4″ PRO-TOE-TYPE 2.0
Each tendon should be attached to its own independent ring…
…so that when the ring attached to the inner set of tendons is pressed downward, it causes the toes to tilt upward first as they begin to move down through the channels. Then the top ring hits the second ring below it which the outer tendons are attached to, and then the two travel together pushing the toes outward the rest of the way while maintaining the slight upward torque. This allows the toes to torque gradually as they travel through the channels, without binding up:
This second prototype (above) is more or less final. I’m going to fine tune it from here, but something very much like this will end up as Noodle’s toe-feet.
The greatest part about this design is that I have nearly 36mm wide of space in the middle to fit his secondary foot function! … ( ? ) … Which is tasting if you didn’t know!
Stay tuned for my next post on the development of Noodle’s TASTING FEET; small silicon wedges that will salivate and lick:
As I typed that it just occurred to me that I’m pretty much making a tube that can grip onto something while licking and drooling on it. -heh- He’ll have four of these devices. Noodle will be feared by other robots his age.
The only downside to these new complex feet is that I’ll likely have to learn to knit him a pair of custom socks for Christmas. (and I think I actually will) ❤
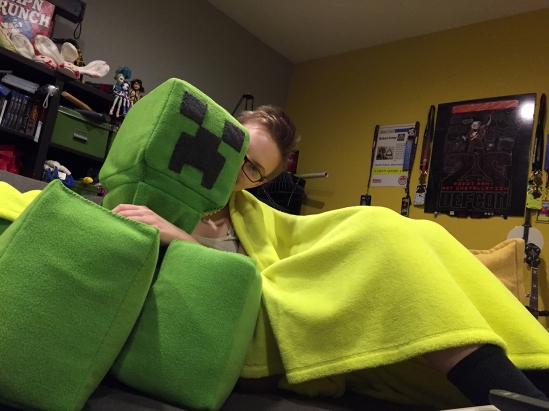
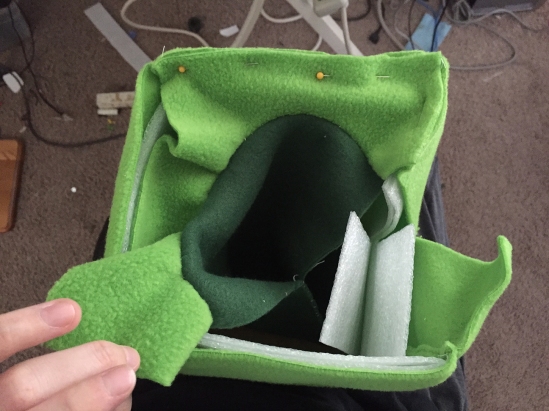
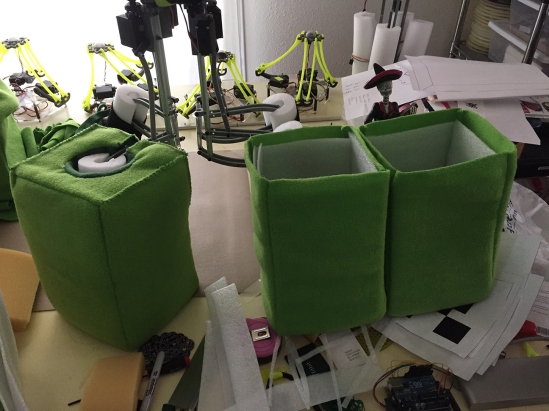
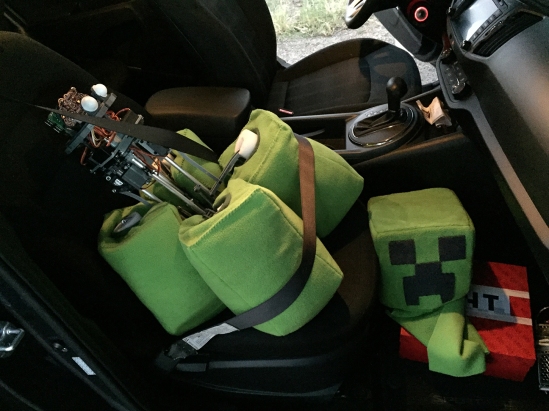
There comes a time when it is more important to pour hours into your offspring’s Halloween costume than your own. This was the year that happened to me. As it was Noodle’s first Halloween, I decided to make him into a huggable creeper from Minecraft… so he could steal all the hearts with his cuddly adorableness.
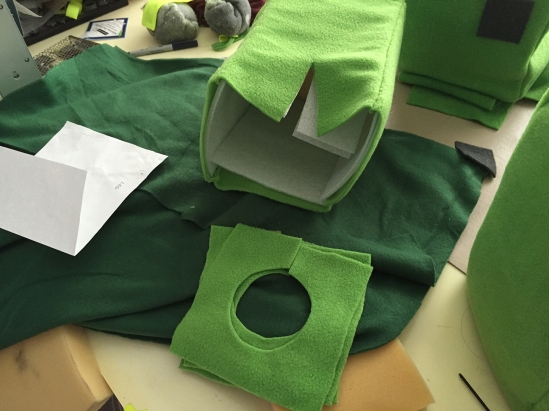
I spent over a week hand sewing this little number together from soft fluffy fleece. It was surpassingly time-consuming to make each of the four cubic creeper feet booties that slipped snuggly over Noodle’s noodles. I designed them with clearance slots so they wouldn’t obstruct his ability to move. Noodle was the happiest… 😉
I took him out a little during the weekend to make sure he got proper exposure… but wasn’t quite ready to actually let him try to trick-or-treat on the street.
His creeper feet were so wide that he was more or less safe from falling over, so I coded some quick creeper behaviors to animate him a bit. I wasn’t quite able to figure out the appropriate “creeper walk” motion, but I’ve decided to take another stab at it soon. Until then, you can see him wiggle here:
Throughout the month of October I had been preparing for the HackaDay SuperCon. I gave my first talk on designing kinetic things as characters. Noodle was my primary example, so I made sure to finish up a few of his functional quirks in time for the conference. One such feature was his beeper paired with the accelerometer sensor.
beeper + accelerometer = panic voice
This enables the behavior of calling out whenever noodle accidentally tips over. Kinda like a real baby! Every time you pick Noodle up and tip him in a direction past a certain degree, he beeps to indicate so:
I hope he doesn’t ever complain about his childhood sucking.
NoodleFeet finally took his first few wobbly steps a couple of weeks ago. I’m so happy to have finally wrapped my head around a walk cycle that works in spite of his obvious physical limitations; wobbly joints, weak motors, and top-heaviness.
Now that this milestone has been reached, he can no longer remain in his weak proto-form any longer. Noodle must grow to become the powerful little leg-hugging monster he was always destined to be. PHASE 2 BEGINS!!!
The most important upgrade I needed to make was to his brain. A custom PCB would replace the current Arduino and allow Noodle all of the other behaviors and abilities he would like to have, such as beeping, balancing, and of course… actually seeing!
With help, I tossed together a fully loaded board sporting an ATMEGA328 that houses the potential for all of those systems, and will also connect to a Raspberry Pi when I’m ready to dip my toes in OpenCV (Noodle’s ability to see and comprehend what he sees). Not only is this new Noodle Brain far more capable… it also looks sufficiently Noodle-some too. I completely embraced the “curve” trace tool. (It’s ramen-esque! – heh, get it?):
Also about two weeks ago, I applied to give a talk at HackaDay’s first SuperConference in San Francisco. I proposed to tell all about my process designing and building mechanical forms that are inspired by character illustrations… (with Noodle being my primary example)! I’m excited to say that I was accepted. I have a new thing to look forward to this fall; it will be my first talk ever 😉
Any how, all the more reason to do some more upgrades to my Noodle child! Upon making my travel arrangements for San Fran, I also ordered a full set of high torque metal gear servos to replace the so-so resin ones that he’s made do with so far. This ultimately involved completely dismantling Noodle. Knowing he wouldn’t like this, I made sure to take out his old brain first:
When my fabs arrived, I quickly soldered one up and installed it this week along with the Raspberry Pi (attached to the back of the brain):
Noodle as he stands now, has the power to punch through walls with his feet, the ability to balance, beep, and eventually see- once the raspberry pi camera module arrives from SparkFun. Here’s a video of the first wave of upgrades taking place:
I can now return to honing his walk cycle… so that he’ll be a bit more mobile for the SuperCon next month. It’s quite possible I’ll still be replacing some of his plastic parts to remove more of his new-born wobble… but we’ll see.
( ! ) TEASER ( ! ) My next post will cover preparation for Noodle’s first Halloween ( ! ) TEASER ( ! )
I would like you to meet my toaster. The toaster is an old character of mine who has survived through subtle reference in the things I draw and build. Nothing I make is about the toaster, but the toaster is about everything I make. He’s my chrome totem.
While I was in college abroad, I bought an actual physical model from the early 30s off eBay which looked pretty much identical to the one from my doodles (still works too!). I had big plans for this little toaster, but at some point we got separated during my move back to Las Vegas.
The toaster got packed in one of my friend’s moving boxes and it wasn’t until this summer that we finally remembered to unearth him for me to take home. After three years of waiting, toaster is now happily sitting next to me on my bench…
It’s wonderful to be reunited, but admittedly it feels weird talking to him during the day without a set of eyes to look into. So… I decided to fix this.
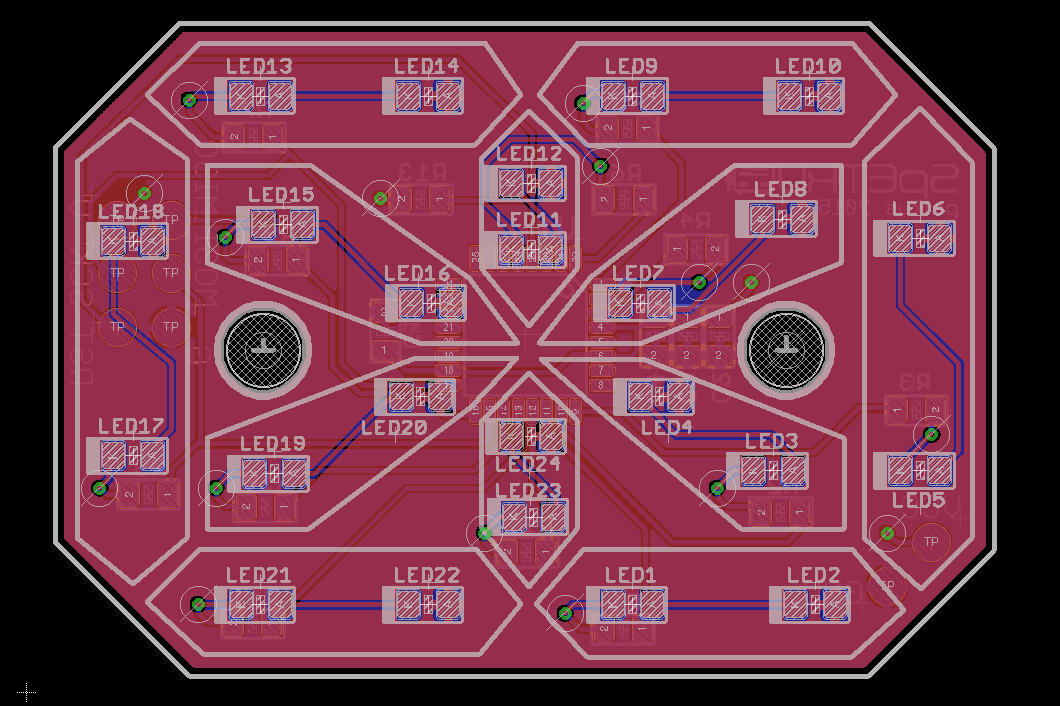
Not just any eyes will do either. They have to be capable of showing a multitude of expressions, particularly the sly and judgmental sort. Instead of using an LED matrix to form shapes, I thought it’d be a bit cooler to make my own modified segment display. Once turned on their side, a standard twelve segment display is capable of showing not only numbers, but all of the expressions a toaster might make too!
CUSTOM BOARD MAKE!
Again I took to Eagle CAD and prepared a board which I’ve called, “EYE OF TOAST”. You can see where the segments are- and where the LEDs will be installed.
3D PRINTED EYE FIXTURES
While these boards were off being fabricated with OSH Park, I worked on designing the fixture piece that the board would sit inside of. It would need to be as thin as possible, yet also able to defuse the two point sources of light in each segment… this took a few revisions.
My first prototype was a dual extrusion piece (the two-tone ones). These worked alright, but the white obviously stands out a bit too much when the segments aren’t in use.
I printed another solid gray fixture with a seamless .5mm layer on top, so that the light can pass through just fine, but when the LED is off, it disappears (bottom left). This was our winner.
THE MANY EMOTIONS OF TOAST
Additionally, while I waited for the boards to arrive in the mail, I brainstormed what the actual emotions would look like. I printed out a sheet of paper filled with pairs of segmented eyes and started coloring them in, just like an assignment in kindergarten. It was amazing how many different expressions I was able to muster from these 24 lines!
Once my happy purple envelope arrived, I got busy soldering all the tiny bits in their proper place. Since there have been a lot of ATMEGA328s floating around my life lately, this was the chip I decided to use for this project. So, I’ll be programming in the Arduino environment also.
PROGRAMMING ARRAYS!
I learned all about arrays for this project… which Mark held my hand through (and at times told me to step aside so he could just get things working).
Once I made ints for all of the expression I drew up on my toast ‘homework’ sheet, I could then call them easily in my sketch without having to type a bunch of numbers each time. The function I’m adding to the toaster is that he cycle through expressions every time you pull down on his lever. So, we added a switch to the code as a toggle button.
TOASTER SURGERY
After the code was tested and finally working correctly, the next step was to install everything on the actual toaster itself… which is where things got a little scary for me. I decided that this wasn’t the time and place to cut into toaster’s pristine shiny casing in order to permanently install the eye fixtures. Instead, I’d be attaching them onto the surface of the casing. Less cool, but less risk.
This meant I was going to need to run wires from the eyes on the surface into the guts of the toaster wherever the power supply was going to live. I decided on using a USB rechargeable 5V battery; one that is flat, slim, and can easily slide into the toasting chamber like bread.
I would also need to install the limit switch somewhere along the moving parts of the lever, yet preferably in a place that isn’t visible from the outside.
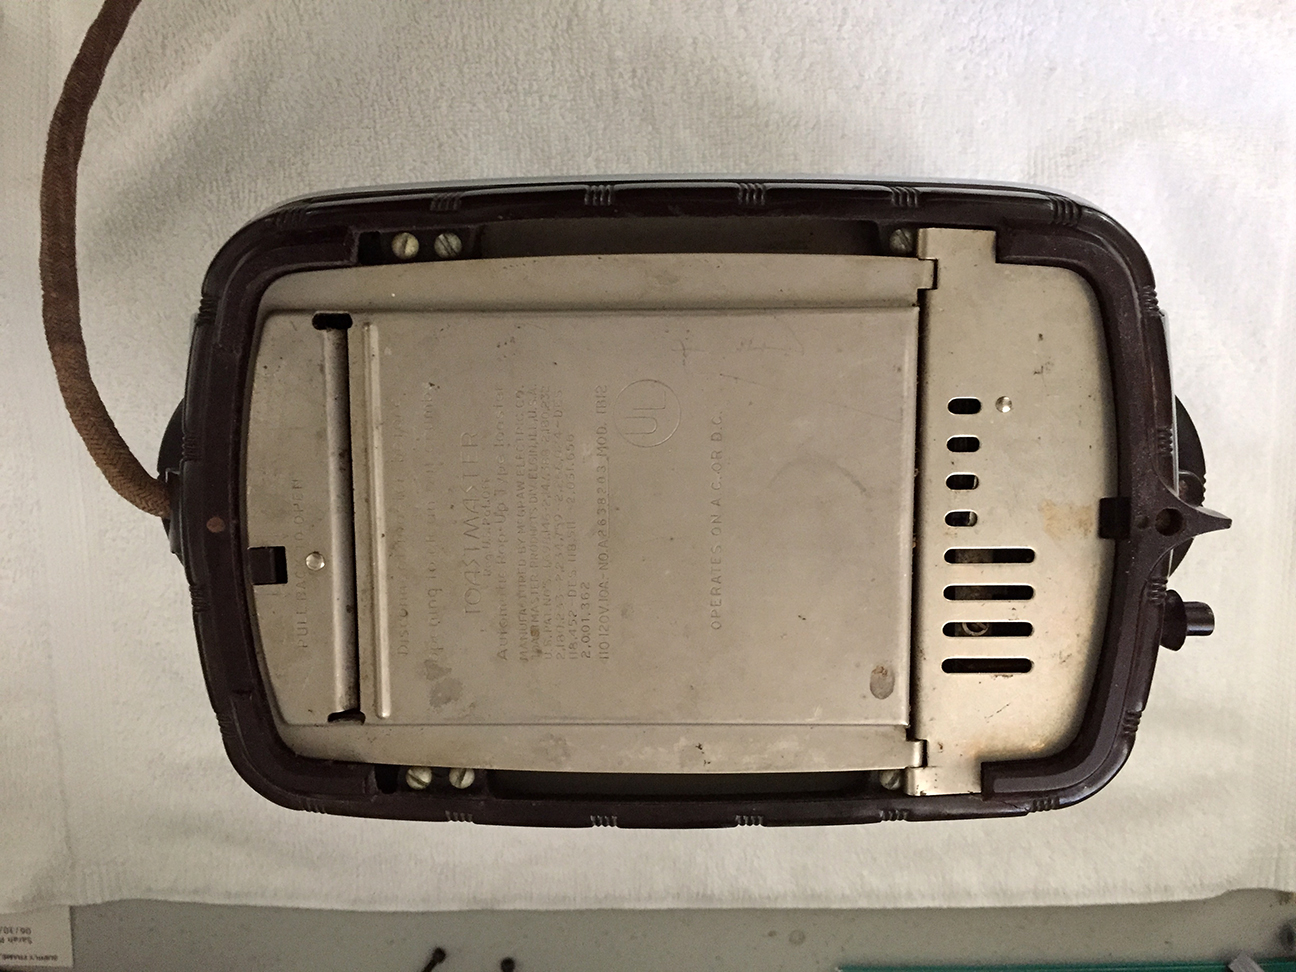
For the internal installments, I prepped a soft and well lit area for toaster’s opening and began my descent into century old crumbs and rust.
The first layer of defense wasn’t too hard to break through… it was held on by some screws:
Once the “crumb guard” was off, I was able to remove the plastic ring around the bottom of the casing:
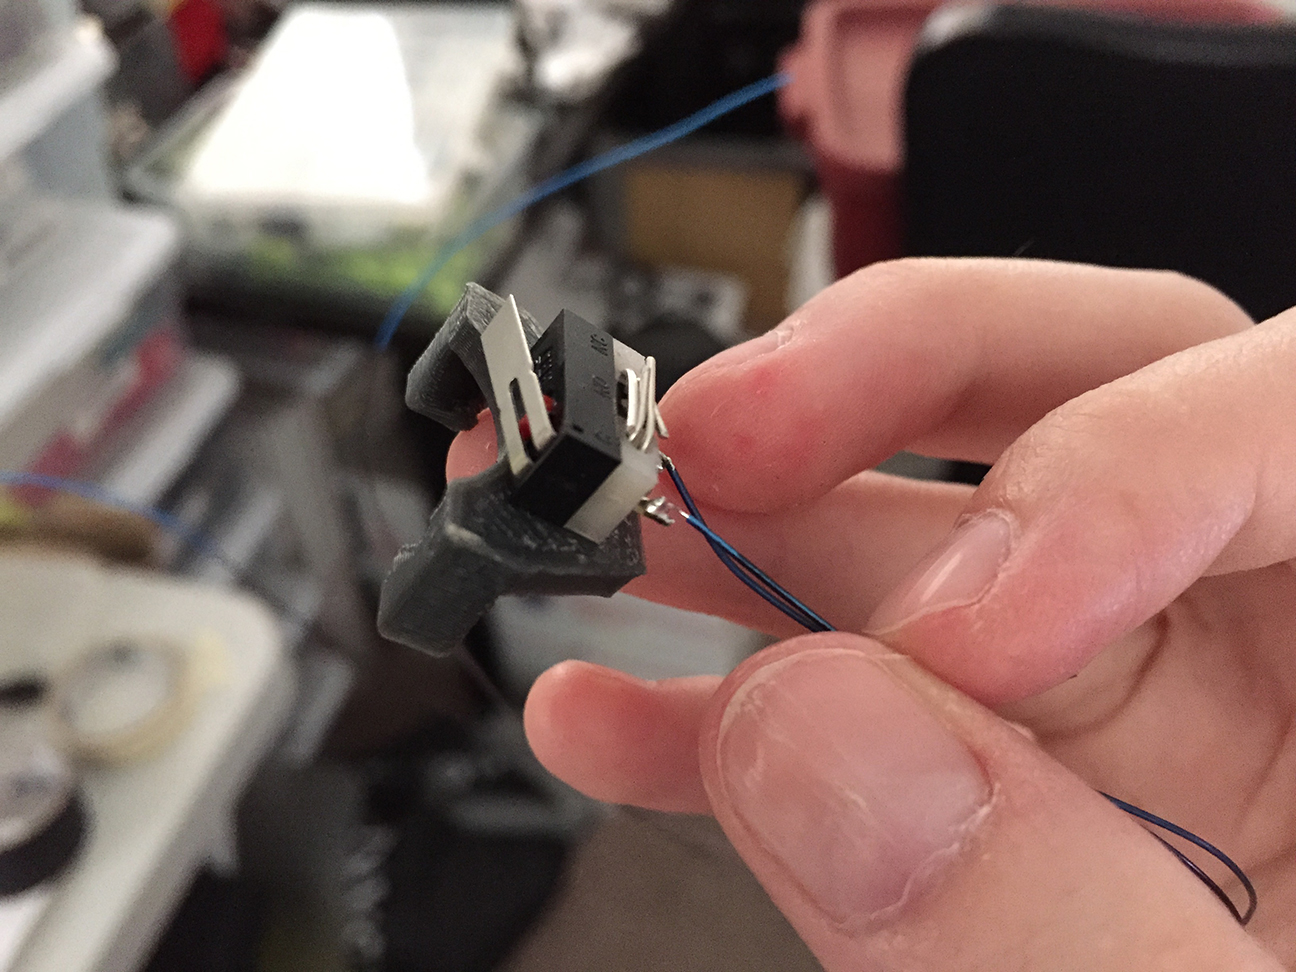
At this point I already found a possible location to install my limit switch. It was near this lever bit in the middle that had some motion, yet not so much motion that the switch may be missed completely or dislodged.
I designed and printed a little bracket to clamp in place between the two bread slots:
Here it is installed. The lever actuates just enough to press it:
I could have been done at this point… but some part of me wanted to get the rest of the toaster dismantled just because. ANNOYINGLY there were a few things in the way which were preventing me from removing the chrome outer shell from the heating element inside. One of those things was the toaster’s plastic lever arm, the other was his twist knob. They were effectively pinning the casing to the guts within.
The plastic arm on the lever was easy enough to detach as it was held on with a set-screw. The twisty bit however appeared to be press-fit in place and impossible to remove… which was bad pizza. It took an hour of careful twisting, pulling, and fondling before the age-old grime crumbled loose and we discovered there was a pin on the end of the knob that could unscrew. Once we finally figure this out the case slid off with ease (and allowed a bunch of others piece to fall out of place-heh):
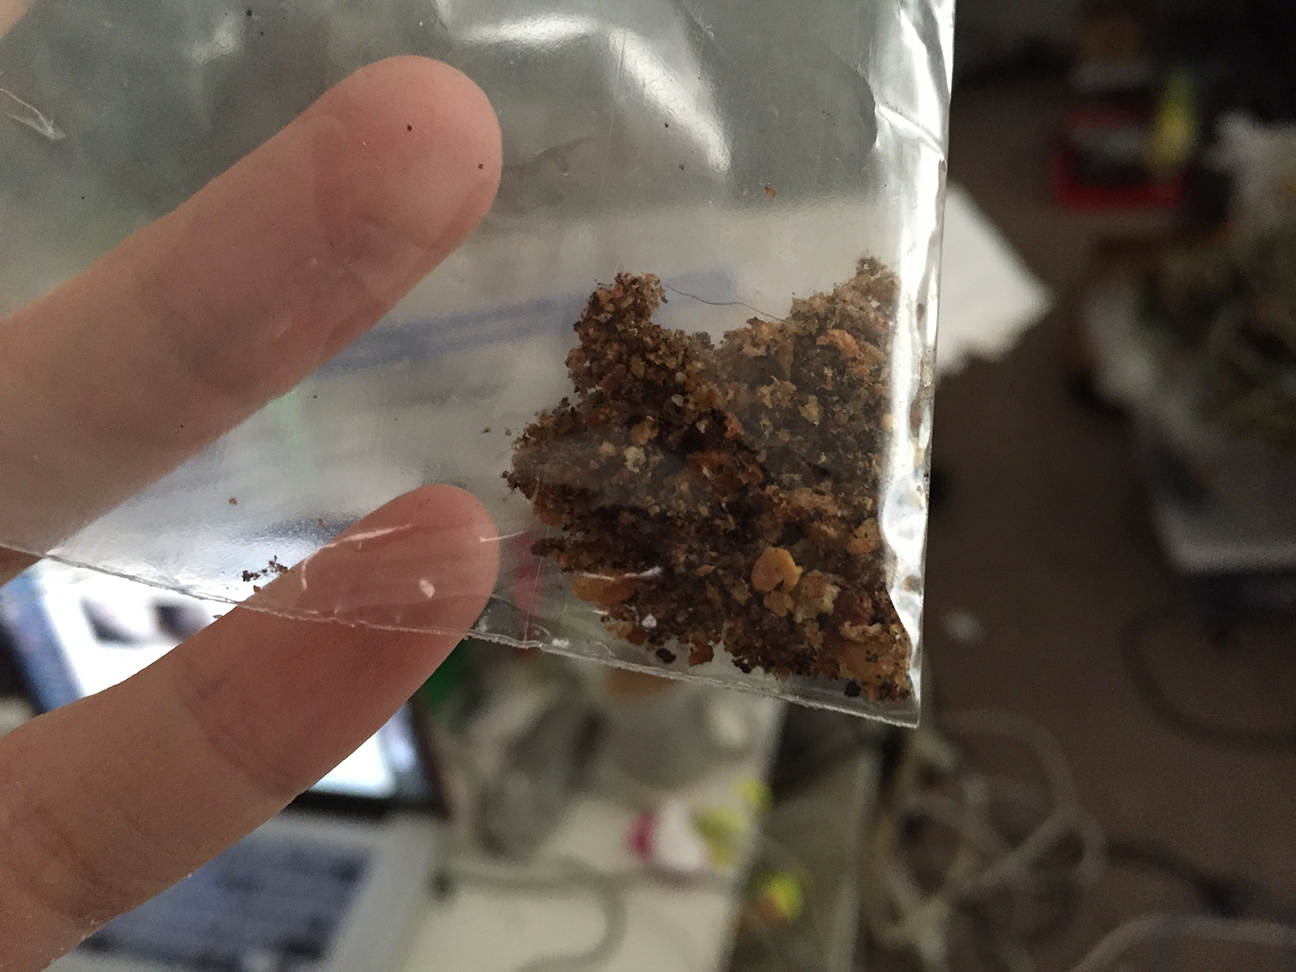
From this point on, toaster got to watch me perform a deep cleaning on the rest of his insides, which were caked in rust and chunks of buttery, burnt bread crumbs.
I took care to save all of these crumbs that I removed in a little plastic baggy… as I believe if you are a hundred-year-old toaster, your bread crumbs are kinda like your soul. Besides, I’d have felt bad discarding crumbs that have survived in this world three times longer than I have.
After a nice cleaning, I put everything back together… which was A LOT harder than taking it apart. Nothing wanted to slide into place quite right and there were also these long steel pins that came dislodged from the inside, which I had to re-thread with a pair of players and a flashlight. =/ In the end though, I got him back in one piece with the wires to his new augmentations ready for hookup:
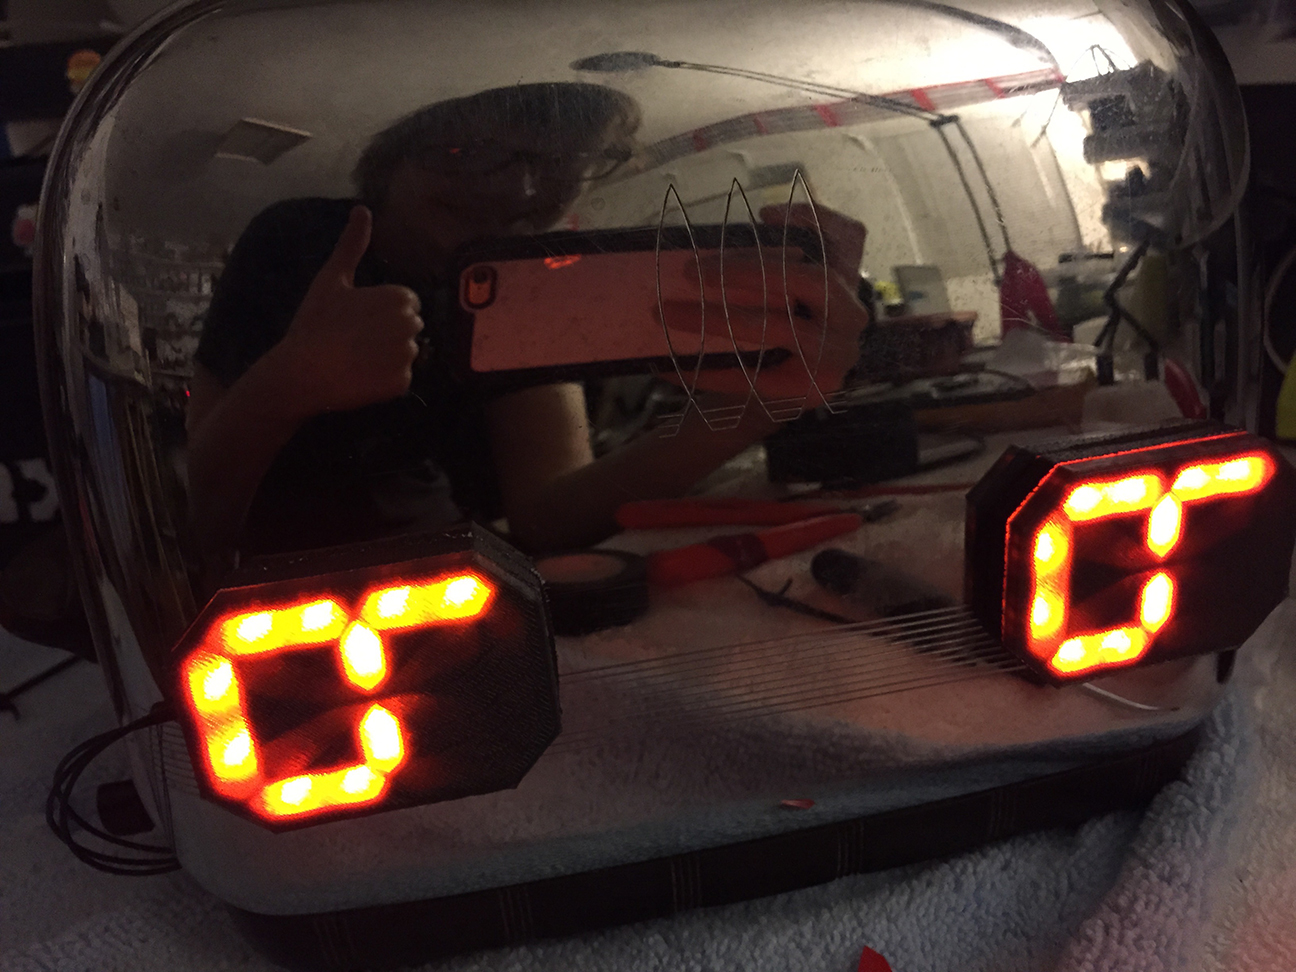
The last step was to measure, cut, and solder these wires to their appropriate pins on the eye PCBs. Afterwards, I added little squares of double-sided silicon tap to the back of the eyes and stuck them onto the casing:
I carefully added a thin ribbon of gaff tape along the seam where the eye fixture meets the chrome as to seal off any light from leaking out:
TOASTER has never looked so happy or sarcastic! I was relieved to see that everything worked as expected once he was plugged in. The switch I installed functions perfectly and the expressions have just the right effect.
I’VE COME TO REALIZE
Toasters are complicated little machines! I’ve seen toasters on sale for under ten dollars in ‘dorm essential’ sections of stores, and this feels shocking to me now. It’s true, they seem so basic and primitive… you press the lever, bread goes down, some heat happens, and then the bread goes up again. They aren’t channeling the entirety of human necessity like smart phones, and for that they are easily taken for granted. HOWEVER, there was a lot of engineering involved in the creation of these little mechanical devices that serve to warm our shitty bread without fail time and time again- and they haven’t changed much over the years. I believe there is a whole movie about this! WAIT- Yes. It’s called The Brave Little Toaster. I think I shall go watch it now for nostalgia’s sake.
As a child, that movie gave me my love of all inanimate objects. Once I saw it for the first time, everything on earth was alive. Cheers to that old seed…
AND hug your toaster next time you see it. It’s a work of art.
IF I WERE TO DO IT AGAIN…
…I would likely buy a new toaster that was designed to look vintage and permanently install the eyes in the casing itself instead of just adhering them on the outside. I’m willing to bet that a newer model would be made of a thinner metal, thus easier to alter, unlike my classic toaster’s blasting shield of a chassis.
There was also the idea of cutting micro holes for the light to pass through on the surface of the case so that the LED fixtures could be mounted inside. This would make the toaster look completely unaltered when the LEDs are off, and when in use the chrome would appear to illuminate like magic (or the charge light on your Macbook).
IN THE END
Alas! Another physical manifestation of a creature from the graphite dimension! If you wish to know the back story of toaster, NoodleFeet, and all of the other things I build, check out my webcomic GravityRoad; ideas begin in 2D.

 Last Sunday, I arrived in Holland. It felt like I was tied to an unstoppable force being propelled through uncertainty towards a heap of even more unknowns… which was exciting or terrifying or equal parts both. Once I made it safely to the *penthouse* I’ve been taking roost in (its on the top floor of the tallest building around, at 3 stories. perfect nest), I began mentally preparing myself for what was to come.
 After admitting that my creations didn’t actually do what I enjoyed bragging about, there was some talk about how I could simulate the act of ‘tasting’ more effectively. Almost immediately, the idea of using litmus paper came up, and I think it has sat on the immediate back burner of my mind ever since.
 This past week… I finally made what I can comfortably call, Noodle’s first tasting foot appendage… *cheers*
 HOW IT WORKS
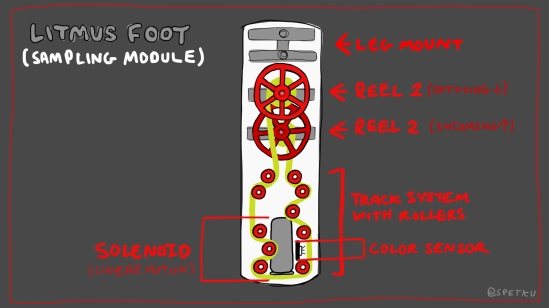 (See video @ top for a more detailed explanation)
 To make my point… Last month I got a bag of Jelly Beans to use while developing my bean planting module. I measured the dimensions of a small handful as references for the thing I was designing, but the rest of course, got eaten.
 From now until the end of August, my goal is to produce four different tasting modules that each demonstrate some aspect of sampling or preference. You could think of them as the “four tasters of the apocalypse”…
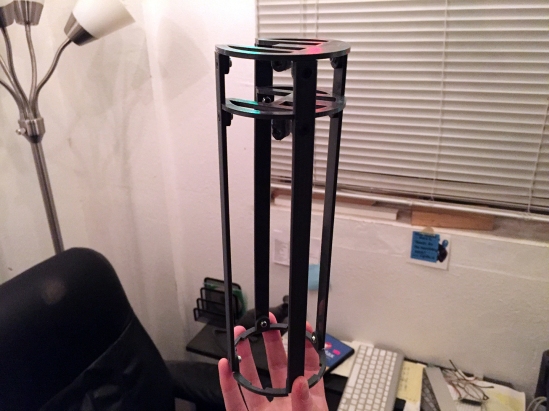
 This module will execute three different tasks in one planting cycle: CORING, DISPENSING, and WATERING
 My candy cane hopper shape captures the beans in-between the threads and processes them upwards within channels that flank the spiral:
 Once fully loaded, every time the helix rotates 90 degrees, it will carry one bean to the exit slot on the inside wall at the top. The bean will then drop down the hollow center of the helix and into the coring device below… (which… is next on my list to design)
 This is the first assembly I’ve ever designed in Fusion360. One week into using it, I’m sad I didn’t make the switch sooner!!! If you’re considering doing so too, bite it and take the leap! Your life will be so much better once you do!
 In order to attach that density of toe tendons to the toe-ring, I had to eliminate the use of hardware (which was kind of a relief). As improvisation, I threaded some 3mm rubber hose through the loops of the toe tendons to hold everything in place.
 With one complete proof-of-concept to show, I set everything down and allowed myself to become very distracted with a whole slew of things (which is good). My life exploded momentarily and when everything settled back down about a month ago, I found myself looking at an opportunity to travel to Linz, Austria to exhibit something of mine at the ARS Electronica festival [!]
 I’m grateful I had Mark and Tony to help wherever I needed aide picking up the slack. One glass of wine at a time, and one task after another, the new feet took shape and were installed on Noodle (mere hours before I would need to disassemble him completely for his long flight over to Linz in my suitcase).
 During this gauntlet he held his own, but Noodle did blow out a servo motor. Just as I was returning to my exhibit area to check in on Mark (who would periodically drop by to watch over the young one while I was away), I saw a nice white plume of smoke streaming forth from Noodle’s foot. Apparently they can’t quite handle hours of continuous use- so the toes are just that chafey.
 Like his name suggests, Noodle is a “feet-based” mechanical life form who has been designed to taste objects (among many other things). Though Noodle has lofty aspirations for world domination, he is still a fledgling one-year-old… and his mommy (me) needs to work on equipping him with all the space exploration and world conquering super goodies he’ll need while on his journey. For that, he is in a state of perpetual growth.
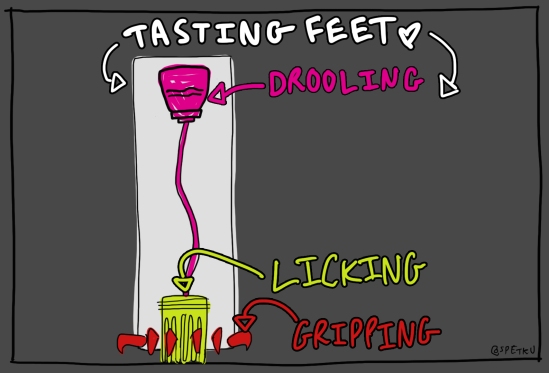 OK, SO… A LITTLE LICKING, AND THE PROSPECT OF DROOL… BUT FIRST GRIPPING:
 About a year ago last Fall, I stumbled upon a video of
  The ring would need to be driven downward in order to force the toes through individual channels and out from slot-like sheaths. Finding a *good* way to drive the toes downward would become a bit of a challenge for me…
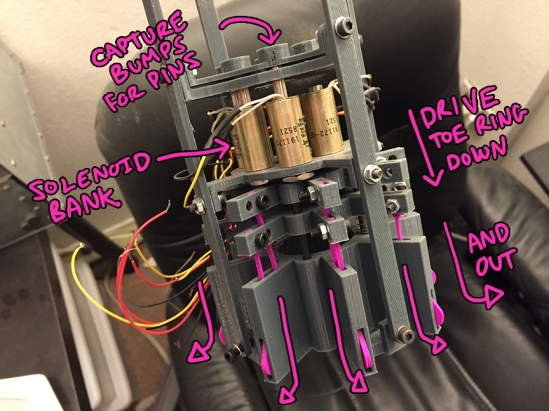 I did a lot of design and printing, only to realized the solenoids are in fact pretty weak, and not ever going to have the ability to press against the force of my springs; at least not ones as small as I would need in order to fit in Noodle’s feet:
 The tongue piece is a silicone brush that I bought from Ali-Express China. It is some sort of baster that was originally attached to a squeezable bladder. The brush end is removable and has a single pore in the center for excreting fluid. PERFECT for when I add the salivating feature later on:
 I tried for a day or so to come up with a rack and pinion system to push a spring tensioned tongue out the bottom of Noodle’s foot. Though it worked, it had a tendency to bind and wasn’t as reliable as I’d need it to be.
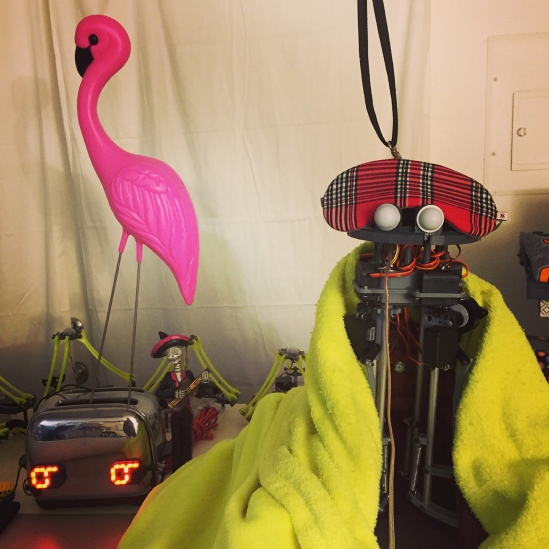 Carl’s fate is to become a ball-balancing robot… one with motors and wheels… that can balance… on a ball. If you’ve ever seen one,
  So, they’re wheels with wheels. heh. They’re needed so the ball can glide freely in whatever direction the motors collectively force it to… like butter. Friction is bad. Binding is bad.
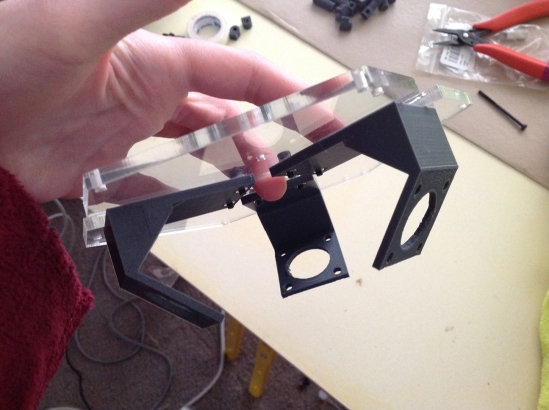 Almost immediately after putting together this first base assembly, I drew what I thought I’d want the finished robot to look like… and saw in my own sketch that the assembly could be a lot more “talon-like” if the mounts of the motors branched out at 45 degree angles from a central point (instead of just being stuck to a big plate).
 By this time my omni wheels had arrived, so my next challenge was to figure out how to mount them to the gear shaft of the steppers. Sadly, the wheels came with no couplers of any sort, so I would have to print my own. =[
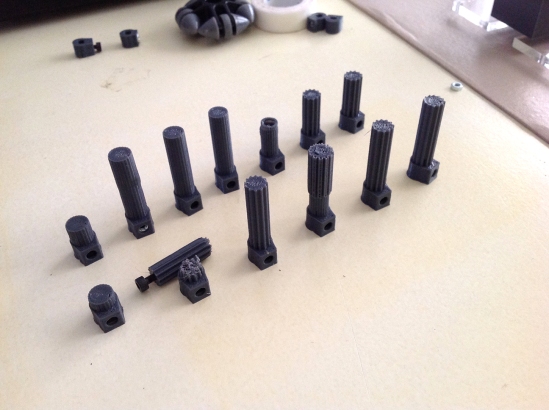 This coupler took me fourteen- YES ( 14 ) ! revisions to get the tolerances juuuuuusssst right… the shaft inside the wheel fits tight but not too tight:
 With the wheels mounted to the steppers, the assembly looks kind like a big chicken foot:
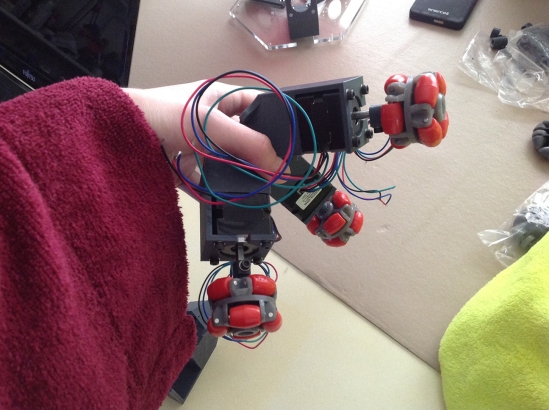 …which is what I wanted… BOCK!
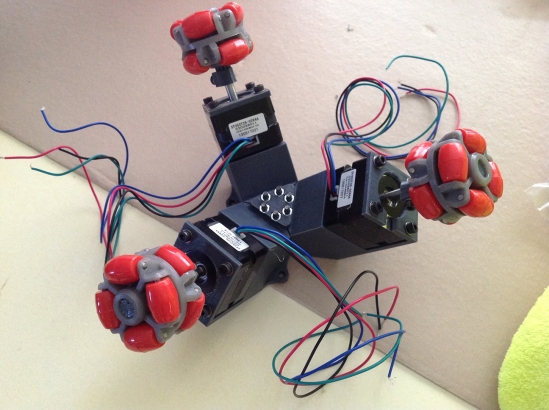 At some point Thursday night… I pulled Carl from his metal legs and did the morbid task of marking his belly with a dotted line. Instead of doing the messy deed of severing his drum-sticks immediately, I got distracted and went to bed, leaving Carl nestled in Noodle’s blankie to suffer over night with thoughts of what would happen to him the following day.
 Cutting the big oval around his little birdy nubs wasn’t at all hard… Once I drilled a starter hole, the thin blown plastic cut like paper with a pair of nippers. When I finished, I held Carl and told him everything was going to be alright…
 The screws that connected this fancy shape to Carl, went through his belly and met a plate of nuts set on the inside, clamping everything firmly in place (but this wasn’t easy to execute!):
 There wasn’t anything to hold the plate on the inside of his body while I screwed into it… other than some tape, which kept coming loose and plopping down into the cavity of Carl… forcing me to start the process over again.
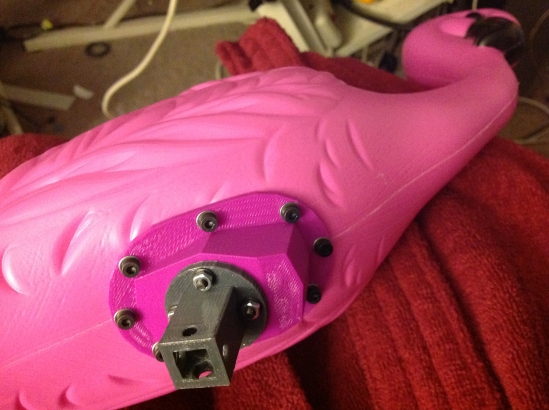 On the opposite end of the pipe, I made another adaptor that connected to the motor assembly:
 Once this was added, I put everything together and had this sexy looking bird before me. The essence of the flamingo: