Noodle’s Gripping Toes

noodleTOES

For the past year, the four tawny stalks that NoodleFeet balances upon have remained common pool floaties, 2.5 inches in diameter, hollow, providing nothing more than the obvious support needed to function as legs… but Noodle longs for something greater.
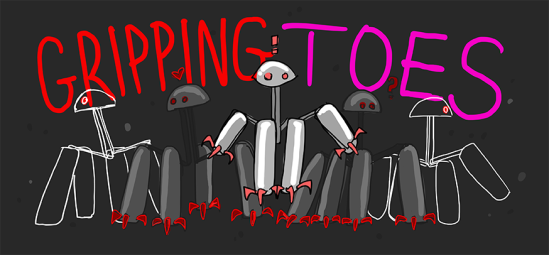
GRIPPING TOES

When Noodle feels threatened, there is little he can do to defend himself. He can beep and perhaps canter away at a slow speed… but he is passive and therefore vulnerable. He isn’t equipped to handle the harrowing task of world domination::cough:: I mean, daily life. To fix this, I decided to add another layer of complexity to Noodle’s most important characteristic: RETRACTABLE GRIPPING TOES for his feet.

A while back, I came across a video of a rock drilling probe concept by JPL. This neat claw attaches itself to a surface by splaying out a hundred or so mini grappling hooks in all directions, which catch on the rock and help anchor the central cylindrical drill in place. I saw this and thought to myself… Noodle needs four of these, as shoes.

Like a good mother, I started brainstorming how to create said shoes. Originally I designed long claw-like toes that rotated out and back, sort of like switch-blades:

Screen Shot 2015-11-11 at 1.50.32 PM

IMG_6632

They fit into Noodle’s original 2.5″ diameter noodle material, and even added stability… but there wasn’t enough area to actually install any motors to actuate things.

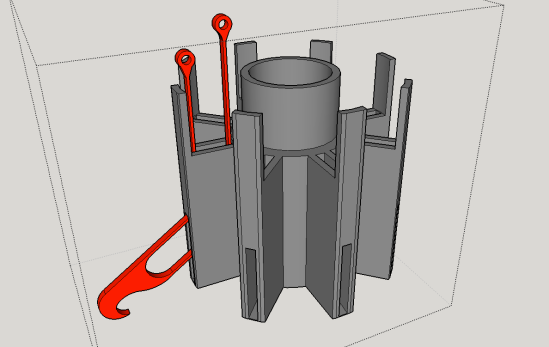
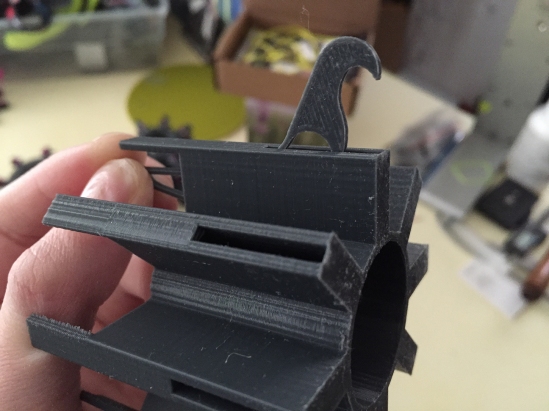
With a little bit of trial and error I rethought the whole design and came up with a solution that made use of 3D printed plastic’s flexibility. This new concept worked more like a cat’s retractable claw, and was similar to the drill from the video that had inspired me.

toe1

Each individual toe (in red) would be forced through a curved internal channel and out the side via two thin bendable “tendons”:

Screen Shot 2015-11-12 at 2.23.46 PM

How The “Tendons” Work

An individual toe has two strands of tendon attached to the back. When the tendons are pulled in opposite directions, it causes the toe to torque upwards or downwards.

Why Do the Toes Need to Tilt Back and Forth?

If the toe goes straight back into the sheath the way it came out, it won’t unhook from whatever its currently gripping. Also, the tip of the toe will likely snag on the edge of the sheath on its way back in. To properly “detach”, the toe should arc upwards slightly as it retracts.

My first prototypes were designed to fit inside the 2.5” diameter noodle material. I was able to make it work, but it didn’t leave much room for the other future functions of his feet (his tongue):

IMG_6656

IMG_6831

In the end I really needed more space to fit moving parts and hardware. Luckily I have a noodle fairy living with me (Mark) who harvested a larger piece of noodle stock from a pile in his garage. It is 4” in diameter and offers me much more room to play around with! Plus, fatter feet will give Noodle more stability!

IMG_6803

4″ PRO-TOE-TYPE 1.0

I tweaked my design for the new 4” material and printed my first prototype with a set of eight twinkling magenta toes (I haven’t ordered red filament yet).

IMG_6812

The reason for the tendons being slightly different in length is so that when they are fixed next to one another, it creates the needed outward/upward tilt:

IMG_6840

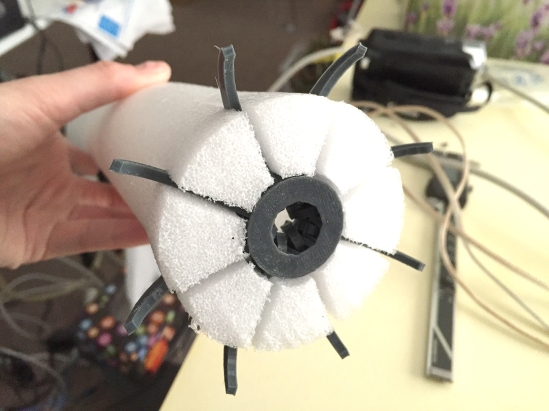
(so, this is what a toe flower looks like):

IMG_6805

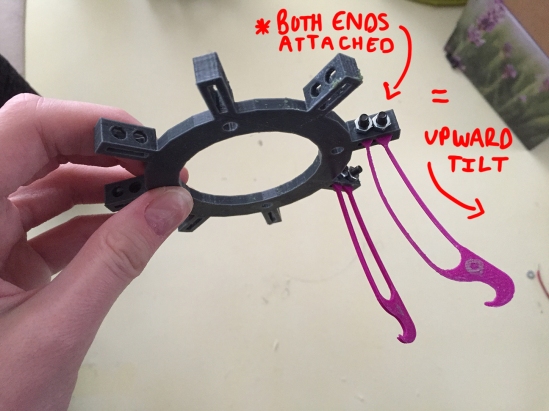
I originally planned to connect both tendons of each toe to a common ring piece (above). When the ring is pushed downward towards the sheath, it would force all of the toes through their channels and outward at the same time. I also added a spring and guide rod (a long screw) below the ring to push it up again once downward force is removed:

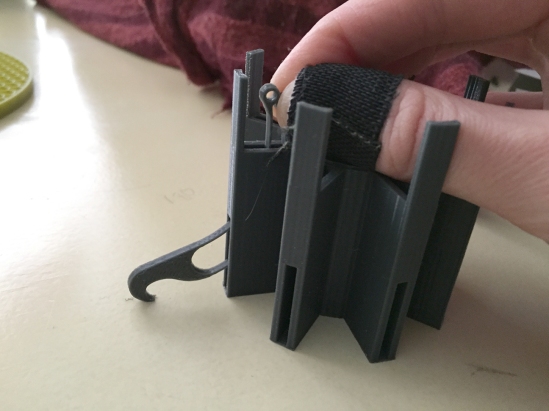
The first complete 4″ prototype worked more or less… It certainly passed the “carpet snagging” test:

I learned right away that I couldn’t actually connect both tendons to the same ring and run it through the inside of the sheath without it binding (which now seems pretty obvious). The only way I could get the above demonstration to work was if I left the longer set of tendons sticking out freely, attached to nothing… so that the toe has no preset angle bias as it attempts to travel through the channel:

IMG_6837

However, in order to make it work at this point, all the little purple pieces sticking out had to be pressed down together at the same time first, or else everything would bind up and destroy itself.
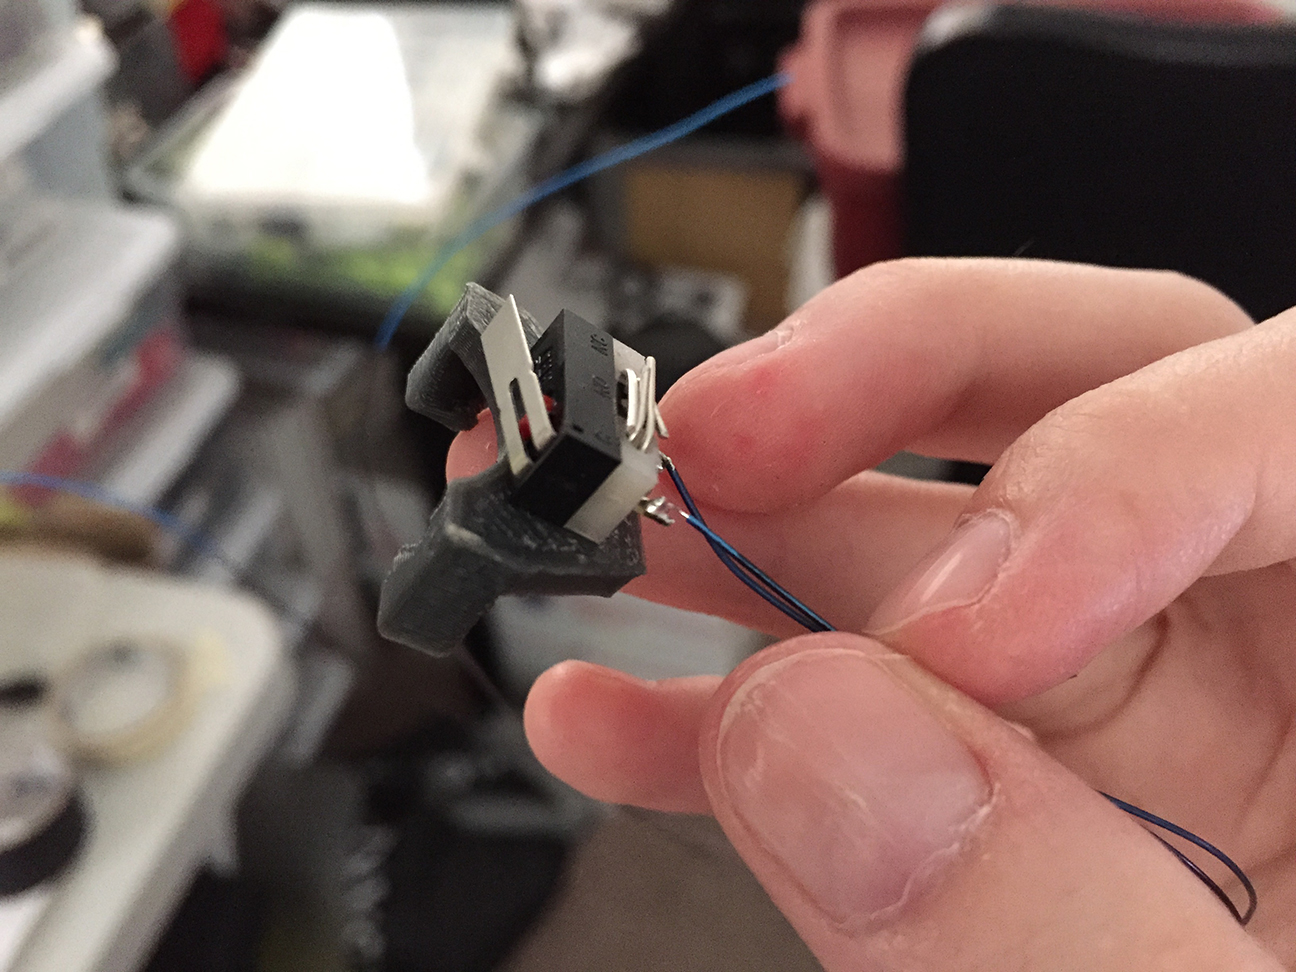
4″ PRO-TOE-TYPE 2.0

Each tendon should be attached to its own independent ring…

…so that when the ring attached to the inner set of tendons is pressed downward, it causes the toes to tilt upward first as they begin to move down through the channels. Then the top ring hits the second ring below it which the outer tendons are attached to, and then the two travel together pushing the toes outward the rest of the way while maintaining the slight upward torque. This allows the toes to torque gradually as they travel through the channels, without binding up:

IMG_6818

This second prototype (above) is more or less final. I’m going to fine tune it from here, but something very much like this will end up as Noodle’s toe-feet.

The greatest part about this design is that I have nearly 36mm wide of space in the middle to fit his secondary foot function! … ( ? ) … Which is tasting if you didn’t know!

Stay tuned for my next post on the development of Noodle’s TASTING FEET; small silicon wedges that will salivate and lick:

Screen Shot 2015-12-06 at 12.19.14 PM

As I typed that it just occurred to me that I’m pretty much making a tube that can grip onto something while licking and drooling on it. -heh- He’ll have four of these devices. Noodle will be feared by other robots his age.

The only downside to these new complex feet is that I’ll likely have to learn to knit him a pair of custom socks for Christmas. (and I think I actually will) ❤

Read about my past progress on NoodleFeet on my website!

More to come soon!

Eye of Toast

IMG_2187.JPG

I would like you to meet my toaster. The toaster is an old character of mine who has survived through subtle reference in the things I draw and build. Nothing I make is about the toaster, but the toaster is about everything I make. He’s my chrome totem.

While I was in college abroad, I bought an actual physical model from the early 30s off eBay which looked pretty much identical to the one from my doodles (still works too!). I had big plans for this little toaster, but at some point we got separated during my move back to Las Vegas.
The toaster got packed in one of my friend’s moving boxes and it wasn’t until this summer that we finally remembered to unearth him for me to take home. After three years of waiting, toaster is now happily sitting next to me on my bench…

It’s wonderful to be reunited, but admittedly it feels weird talking to him during the day without a set of eyes to look into. So… I decided to fix this.

Not just any eyes will do either. They have to be capable of showing a multitude of expressions, particularly the sly and judgmental sort. Instead of using an LED matrix to form shapes, I thought it’d be a bit cooler to make my own modified segment display. Once turned on their side, a standard twelve segment display is capable of showing not only numbers, but all of the expressions a toaster might make too!

CUSTOM BOARD MAKE!

Again I took to Eagle CAD and prepared a board which I’ve called, “EYE OF TOAST”. You can see where the segments are- and where the LEDs will be installed.

Screen Shot 2015-08-11 at 9.49.16 PM

3D PRINTED EYE FIXTURES

While these boards were off being fabricated with OSH Park, I worked on designing the fixture piece that the board would sit inside of. It would need to be as thin as possible, yet also able to defuse the two point sources of light in each segment… this took a few revisions.

IMG_5910

My first prototype was a dual extrusion piece (the two-tone ones). These worked alright, but the white obviously stands out a bit too much when the segments aren’t in use.

I printed another solid gray fixture with a seamless .5mm layer on top, so that the light can pass through just fine, but when the LED is off, it disappears (bottom left). This was our winner.

THE MANY EMOTIONS OF TOAST

Additionally, while I waited for the boards to arrive in the mail, I brainstormed what the actual emotions would look like. I printed out a sheet of paper filled with pairs of segmented eyes and started coloring them in, just like an assignment in kindergarten. It was amazing how many different expressions I was able to muster from these 24 lines!

toastEye2

Once my happy purple envelope arrived, I got busy soldering all the tiny bits in their proper place. Since there have been a lot of ATMEGA328s floating around my life lately, this was the chip I decided to use for this project. So, I’ll be programming in the Arduino environment also.

toastEye1

PROGRAMMING ARRAYS!

I learned all about arrays for this project… which Mark held my hand through (and at times told me to step aside so he could just get things working).

Once I made ints for all of the expression I drew up on my toast ‘homework’ sheet, I could then call them easily in my sketch without having to type a bunch of numbers each time. The function I’m adding to the toaster is that he cycle through expressions every time you pull down on his lever. So, we added a switch to the code as a toggle button.

TOASTER SURGERY

After the code was tested and finally working correctly, the next step was to install everything on the actual toaster itself… which is where things got a little scary for me. I decided that this wasn’t the time and place to cut into toaster’s pristine shiny casing in order to permanently install the eye fixtures. Instead, I’d be attaching them onto the surface of the casing. Less cool, but less risk.

  • This meant I was going to need to run wires from the eyes on the surface into the guts of the toaster wherever the power supply was going to live. I decided on using a USB rechargeable 5V battery; one that is flat, slim, and can easily slide into the toasting chamber like bread.
  • I would also need to install the limit switch somewhere along the moving parts of the lever, yet preferably in a place that isn’t visible from the outside.

For the internal installments, I prepped a soft and well lit area for toaster’s opening and began my descent into century old crumbs and rust.

IMG_5930

The first layer of defense wasn’t too hard to break through… it was held on by some screws:

IMG_5937

Once the “crumb guard” was off, I was able to remove the plastic ring around the bottom of the casing:

IMG_5943

At this point I already found a possible location to install my limit switch. It was near this lever bit in the middle that had some motion, yet not so much motion that the switch may be missed completely or dislodged.

I designed and printed a little bracket to clamp in place between the two bread slots:

IMG_5947

Here it is installed. The lever actuates just enough to press it:

IMG_5959

I could have been done at this point… but some part of me wanted to get the rest of the toaster dismantled just because. ANNOYINGLY there were a few things in the way which were preventing me from removing the chrome outer shell from the heating element inside. One of those things was the toaster’s plastic lever arm, the other was his twist knob. They were effectively pinning the casing to the guts within.

IMG_5963

The plastic arm on the lever was easy enough to detach as it was held on with a set-screw. The twisty bit however appeared to be press-fit in place and impossible to remove… which was bad pizza. It took an hour of careful twisting, pulling, and fondling before the age-old grime crumbled loose and we discovered there was a pin on the end of the knob that could unscrew. Once we finally figure this out the case slid off with ease (and allowed a bunch of others piece to fall out of place-heh):

IMG_5986

From this point on, toaster got to watch me perform a deep cleaning on the rest of his insides, which were caked in rust and chunks of buttery, burnt bread crumbs.

IMG_6027

I took care to save all of these crumbs that I removed in a little plastic baggy… as I believe if you are a hundred-year-old toaster, your bread crumbs are kinda like your soul. Besides, I’d have felt bad discarding crumbs that have survived in this world three times longer than I have.

After a nice cleaning, I put everything back together… which was A LOT harder than taking it apart. Nothing wanted to slide into place quite right and there were also these long steel pins that came dislodged from the inside, which I had to re-thread with a pair of players and a flashlight. =/ In the end though, I got him back in one piece with the wires to his new augmentations ready for hookup:

IMG_6002

The last step was to measure, cut, and solder these wires to their appropriate pins on the eye PCBs. Afterwards, I added little squares of double-sided silicon tap to the back of the eyes and stuck them onto the casing:

IMG_6008

I carefully added a thin ribbon of gaff tape along the seam where the eye fixture meets the chrome as to seal off any light from leaking out:

IMG_6023

TOASTER has never looked so happy or sarcastic! I was relieved to see that everything worked as expected once he was plugged in. The switch I installed functions perfectly and the expressions have just the right effect.

IMG_6031

I’VE COME TO REALIZE

Toasters are complicated little machines! I’ve seen toasters on sale for under ten dollars in ‘dorm essential’ sections of stores, and this feels shocking to me now. It’s true, they seem so basic and primitive… you press the lever, bread goes down, some heat happens, and then the bread goes up again. They aren’t channeling the entirety of human necessity like smart phones, and for that they are easily taken for granted. HOWEVER, there was a lot of engineering involved in the creation of these little mechanical devices that serve to warm our shitty bread without fail time and time again- and they haven’t changed much over the years. I believe there is a whole movie about this! WAIT- Yes. It’s called The Brave Little Toaster. I think I shall go watch it now for nostalgia’s sake.

As a child, that movie gave me my love of all inanimate objects. Once I saw it for the first time, everything on earth was alive. Cheers to that old seed…

AND hug your toaster next time you see it. It’s a work of art.

IF I WERE TO DO IT AGAIN…

…I would likely buy a new toaster that was designed to look vintage and permanently install the eyes in the casing itself instead of just adhering them on the outside. I’m willing to bet that a newer model would be made of a thinner metal, thus easier to alter, unlike my classic toaster’s blasting shield of a chassis.

There was also the idea of cutting micro holes for the light to pass through on the surface of the case so that the LED fixtures could be mounted inside. This would make the toaster look completely unaltered when the LEDs are off, and when in use the chrome would appear to illuminate like magic (or the charge light on your Macbook).

IN THE END

Alas! Another physical manifestation of a creature from the graphite dimension! If you wish to know the back story of toaster, NoodleFeet, and all of the other things I build, check out my webcomic GravityRoad; ideas begin in 2D.

The Thing You Follow Without Trying

toast

I’ve always wanted to produce a graphic novel, but I’ve tried and failed to keep the momentum up numerous times throughout my life. ITS FRAKKEN HARD. I’m not the best at drawing, but I like doing it… and at this point I’m good enough that I can crank out images without fussing over them too much. So I’m giving it a go once more.

The story I’ve chosen to tell is a cracked-out trip of an autobiography. It’s about the important events of my life, told through the dreams I had at those particular times. This is all mapped over a set of characters I’ve been drawing forever who live in a post-human word. It doesn’t make much sense unless you remember to think of everything as a metaphor… much like interpreting dreams, right?

For an additional layer of fun, I’ve only started illustrations after my second cocktail of the evening. This works to keep the storytelling honest while preventing me from getting held up over perfecting my drawings.

The project is called Gravityroad,which is a title I’ve used for a great many things. The comic was originally going to be called “Milktoast” as a nod to the story’s two main characters, also implying the drunken practice of drinking and drawing. Someone did eventually point out that “Milk Toast”… in its many forms of spelling is already used as a title for a few other comics that exist out there in the ether. So, as to clench uncontested domain, I switch the name to good ‘ol Gravityroad.

This is what I’ve been piecing together for a large chunk of the summer. It isn’t electronic, hackerie… or an actual robot… but the comic should explain the back story to most of the robots and gizmos I’ve made over the past five years (like Noodlefeet!). It is the spiritual history of all things Sarah. If that seems cool to you, or you just like seeing robot art, I encourage you to check it out. It is of course, science fiction flavored.

My New jellyBot Prototype, Racky


IMG_1097

About a year ago I started building a robotic jellyfish inspired by Festo’s submergible AquaJelly. I was just beginning to figure out how to get the thing moving when I got sidetracked with the prospect of launching a Kickstarter campaign and dropped the project cold. During this whole long year while I’ve been fulfilling the said Kickstarter, this poor jelly prototype (“Boney”) has watched silently from a distant shelf in the workroom, begging me to pick it up again. Finally this weekend I was able to spend some time giving the old parts a makeover… in yellow.

I added a nice gentle curve to the moving pieces, taking after the design of its cousins, the delta robots :

IMG_1040

IMG_1042

Last year I decided to use a rack and pinion to get the parts to move in leu of Festo’s fancy linear actuator that they showcase in their model. Never having used, let alone designed a working rack and pinion before, this took some fussing about to get just right. The two servo motors I chose to drive the jelly’s motion are attached to a fixed central core of steel rods which two separate radial disks glide up down upon. All of the jelly’s flowing arms will be attached to the elbow of the mechanical arms, and as the disks these arms are attached to move back and forth, towards and away from each other, a sort of circular pumping motion is made.

IMG_1079

The two rack and pinion sets are in place now, each on opposite sides from one another moving different pieces in opposite directions. The rack passes through a slot in the opposing central disk, allowing it a deeper breadth of motion as well as keeping it in place. The only thing I seem to be missing at this point is a tensioner to press the rack against the gear on the driveshaft of the motor, so I have plans to whip one up later tonight.

On my old prototype, I used plain long strips of sheet ABS as stand ins for the jelly’s long flowing arms. They worked more or less, but weren’t very nice to look at :

IMG_4097

For this rendition of the bot, Mark offered me some of his old shelf liners from the garage to use. These happened to be an awesome semitransparent gray that matches the printed parts of the jelly perfectly! I decided on an elongated spade shape for the tendrils this time :

IMG_1046

These pieces connect at one end to a small ring, creating the umbrella of the jelly (the delta robots watch from the side in aw…) :

IMG_1056

The center of the umbrella mounts to the top portion of the drive shaft with a fancy pants shape sandwiching it in place like so :

IMG_1058

Once I design my tensioner for the rack and pinion and finish printing and attaching the rest of the jelly’s small arms (all of this depending on whether or not my printer stops being a butt) I can then start working on some test code to get the thing moving! I have no idea really if my design will work at all… I’ll just have to wait and see. For now though, it’s getting acquainted with all of its brothers and sisters in the war room. =]

IMG_1078

My next post will likely be about whether or not I succeeded mechanically in getting the jelly to do what its supposed to. Cheers!

IMG_1116


DefCon 22

get-attachment.aspx

Picture taken by Aakin!

Sunday evening I collapsed on the couch with a nice big glass of red wine after having unloaded the very last of our stuff back into the house… thankful that I’m alive, in one piece, and that nothing critical went wrong this weekend. I have more awesome memories for the grey squishy hard drive. Here are the highlights on a few of my experiences :

Our Kids’ Second Big Recital >.<

DELTAS! They were there! This being our second time attending the con, we wanted to participate by bringing our own taste to the medicine. Friday night during the event of random fun and mischief, we had a nice dark sliver of space to set up all of our babies in. The best part being that we didn’t have any rules or restrictions for the space we were showing in like at Maker Faire. We could pretty much do anything we wanted; our own cooler filled with beer was present, our own speakers with music were set up, and we turned the back wall into a looming place of worship for those of us who accept robots into our hearts as personal overlords and saviors. ❤

messageTheDaemon1

However, setup left a bad taste in my mouth. We had issues during load-in involving some things we were led to believe would be provided in the room yet weren’t. This in itself wasn’t the problem; the resistance we encountered while trying to fix it was.  A few of the Goons seemed to get off on our dilemma, being purposely withholding instead of doing what they could to help, and then became pissy and annoyed with us once we resorted to taking matters in our own hands to get what we needed. If the people running Defcon expect others to go out of their way to set up art and events at their convention with nothing to show for the effort, the very least they can be is accommodating and maybe a little gracious. The Defcon staff we encountered were all stressed out and moody which might have been due to the lack of organization, or it could stand that in an economy where everyone is being paid with perceived status rather than money, undies will get knotted up… and egos will inflate. =/

Anyhow, once we were ready to go- dismay aside, everything went fucking awesome. We received an excellent response and got great feedback from fellow hardware hackers. It was the most rewarding experience to see people interact and dance around with the robots while radiating that megalomaniacal hype we’re aiming to bring out of people. I had many interesting, insightful conversations with other techie avant-garde, as well as with those of the goons who weren’t ten feet up their own asses. =]

get-attachment-1.aspx

At the end of the night Mark and I got to deconstruct our little ones alone in private. The hallways were silent, dark, and devoid of life, which was surreal in contrast to how congested they were at every other time. In our own zen we packed up the show, unloading at Mark’s place by 4:30 Saturday morning. I slept so hard I forgot where I was when I woke the next day back at the hotel.

Darknet was a huge success!

photo taken by hackerphotos.com

Photo taken by hackerphotos.com

Everyone was working until the final hour (minute) on every facet of this event to make sure it was loaded with kickass once Defcon began on Thursday. Of course, Smitty’s highly involved live RPG was all the rage this year. Holly shit. By the time I got down to the HHV in the morning, the DarkNet badge kits were sold out! I heard that on Saturday there were 600+ people in line to fight over the remaining 80!

IMG_0800

The few they had left were auctioned off before Crash and Compile for over a hundred dollars a piece! I am SO PROUD of the whole team for the amount of effort they poured into coordinating things this year. It was no easy task, so I’m glad that the Defcon lords recognized this by making Darknet a black badge event this year!

IMG_5239

We raised over four-thousand dollars for the EFF… and for me, the great part is knowing that we did it in style 😉 Darknet shirts happen to be sexy. Just saying. Virtual high-five team!

dcfLYER

Fellow Makers Rock Defcon with their Laser Robots!

Mark and I met two really cool people at Maker Faire this year, Kathryn and Alvaro. This tech savvy duo of robot wielding awesomeness had a laser shooting gallery in San Mateo. Being their area of expertise, they brought an amped up laser turret with them this year to compete in the DefCon Bots challenge. The goal was basically to create a robot that could scan and find blue balls (teehee!!) moving through a depth of dark space and then aim a laser to shoot at them. That’s no easy task! We came to cheer them on this Saturday and were happy to catch their big win! They were up late making last-minute improvements on their laser baby, but it paid off in the end… =] Great work guys!!!

The best badge is the one you make yourself.

In a pop-up culture of status dictated by the thing hanging around your neck, there is much talk of badges at Defcon. Black badges, human badges, modding, decoding, hacking, and alas… making your own, which a few people did. As for us, Mark and I created a board out of the key I designed for the Darknet propaganda. It’s a nice little memento for this year which we proudly bared as board designers. Purple FTW!

IMG_0766

IMG_0774

We met someone who made an “Impostor” badge through OSH Park, which was the most snarky and creative rendition of the Defcon 22 badge at the entire con as far as I’m concerned :

10537036_10151935179027614_5910858698919986095_n

All of the text negated everything on the original, for example saying “light arc” instead of “dark tangent” on the back, and “found” instead of “1o57”. Tehe. In love. The UV SMT LEDs were a nice touch too.

Then there is sharpie and gaff tape :

IMG_5959

Because the better things in life are neon yellow.

Crash and Compile

IMG_5241

Glitter. What? Nah… it wasn’t me. =]

So I didn’t wear a big penis this year. To change it up a little, my strategy was to annoy and systematically emasculate all of the competitors with dolls. I built a “Barbie bandolier” which held my many personas through which I communicated during the event. This got easier to do the more hopping drunk I became. – I was sure to make a doll-sized strap on as a throwback :

defconLickIMG_0785

Though I spent a lot of time trying to derail team Frink, the defending champions, I poured twice as much effort into bothering the team who won this year… Sprechen Sie Dick Picks. No one could get these dudes to make eye contact with them. They had the purpose of a bullet train and though they did a good job of kicking everyone’s ass, I think they missed one other very important aspect of the whole event : by the end it should feel like a circus on stage… and everyone seemed more sober than I remember last year (but that might just be because I was more drunk than the rest). Congrats to all of you for competing! (and for putting up with our shenanigans)

Jeff and his crew did a fantastic job of preparing for the event again (Jeff is a rock star, as he also designed the board in the Darknet kit again this year in addition to preparing for the contest). Between the contest holders and the teams programming, we polished off three kegs of beer over four hours. It all went by so very fast. Here is the sexy trophy he made this year, a shiny head-sized D12 :

IMG_5242

SYN Shop Teaches Soldering to the World

I’m happy to say that our local Hackerspace, SYN Shop, had a presence in the hardware hacking village this year! Brain along with several other volunteers manned the tables of tight and person soldering stations, happy to show those who had picked up a kit in the vendor area how to melt lead like a pro.

When Everything is Said and Done

The child-like wonder of falling down the rabbit hole was gone, but I felt like I found my own niche in the big picture this year. I’m proud of all my friends and the work they put forth to make the event what it was. =] Time to get back to work. We’ve got robots to ship and the rest of the world to take over.

This is another notch in our belt… or shiny thing on our wall. It’s all about enjoying the journey!

IMG_8483


Elemental Mood Lighting : The Moving Bits

First I have to show off how nicely the prints turned out! Some of these larger pieces were printed over night for nine-hour periods and were completed without fail (which is surprising). In the morning there would be a loaf of stone sitting on the printer bed :

IMG_0551

Mark is responsible for creating these seamless linear designs on the face of the stones :

IMG_5115

IMG_5128

We ran out of natural filament by the time we got to the ‘wind’ stone, so it’s in a silver/gray color instead. This one was printed last because unlike the other three stones, its design is on the upper portion which overlaps the wedge pieces that pop out. It called for a little more fuss and planning when designed :

IMG_5119

IMG_5120

Over all, I’m extremely pleased with how they look so far. I can’t wait to paint them though….!

IMG_5113

I spent most of this past weekend getting the mechanical parts in working order. For this project, that’s actuating those three wedge slices on each face of the stone to slide out when ‘activated’ :

IMG_5076

I’ve had some tiny servo motors lying around from a couple of summers ago when I first started making delta robots… this is the perfect chance to finally use them. They fit nicely in the center of each column.

The LEDs also needed to be mounted somewhere on the top. The only realistic place to put them was in between the wedge pieces in the three corners. Luckily for Mark and I, we have a million little RGB LED boards for our Kickstarter kit (which we’re also working on fulfilling right now), so we were able to repurpose a few of those conveniently size squares. The mounting plate I design ended up looking like a very odd throwing star once it was printed :

IMG_5086

Alas, their design has two functions: to hold the LEDs, and to funnel the three push rods through the center to the motor, keeping them nicely aligned.

The servo bracket attaches to this LED throwing star piece like so :

IMG_5096

And the whole ‘core’ drops down the center of the stone through the top, resting on the foam core inside :

IMG_5088

This design is nice because all of the wires for the LEDs and motor fall straight down to the bottom plate of the stone, where one of our brain boards will be running the whole show (We also have a few prototypes of this board from our KS kit hanging around, and since they use the ATMegas 328 and already have designated servo and LED headers, they’re perfect for this job) :

IMG_5099

IMG_5121

We have it rigged up so that when you hit a button, the stone opens and the LEDs slowly turn on. We also need to get all of the motors calibrated so that the wedges come out to the correct spot on cue and then suck back in all the way when deactivated.

The next step is to replace the button with some sensor input! Mark will likely work on perfecting that part while I texture and paint the outside of the stones. =]


Bunny Slippers of Death

My birthday was this past week and Mark made me something so frekkin awesome that I had to write a post to share it. First of all, we all know gifts that are made are far better than gifts which are bought. Gifts are even better still when they were made with inspiration from something you did… in this case, a drawing I made that Mark pulled into reality with his craftsman/techie prowess!

BEHOLD. Bunny feet of death :

IMG_4925

IMG_4929

IMG_0497

Mark collaborated on these with his awesomely talented friend from work, Emily Wiersma… who designed the ears, which she engineered to stand up and hold their shape when worn, as well as the adorable bunny faces!

Mark created the eyes, which are 3D printed compartments that hold both a power supply and tiny SMT LED!

I drew these almost a year ago back when I first started planning the Robot Army Kickstarter Campaign. Since I already own the red hooded robe, I can now actually wear this costume to Maker Faire. All I need now is the big centurion helm :

deltaArmy

HUZZAH!

IMG_0502

❤ Thank you Mark and Emily for yet another amazing life relic.

Robot Army : Our First Rush

fundingJump

There were some experiences involved with launching a Kickstarter that I had been heavily anticipating. The most obvious of which being the excitement that follows your first big rush of backers. – Sort of like Christmas, but in the form of a global affirmation that your ideas are liked, understood, and that there is a place in the world for people who dare to seize their dreams.

Though Mark and I were off to a respectable start… our momentum pittered out rather quickly and for a good day and a half we crawled through six or seven percent. It was agonizing. Maybe we were expecting too much. Since we haven’t yet been picked up by any major feeds, its been a matter of sitting in front of the laptop every morning and kindly reminding/begging people to post about our project and help us get the word out.

After blasting yet another batch of such emails to a whole bucket of contacts, I sprawled out on the couch and dozed off. It was a nap of acceptance and release. At some point, Mark walked into the living room and yelled at me for sleeping. He sat down next to me quietly and gave me a hug, feeling something similar- which I can’t really define. A moment later I picked up my phone and checked to see how long I had been out, to find that I had an endless list of push notifications informing us that we had new backers.

Long story short… I suppose Kickstarter featured our project, and once this happened we started getting traffic in a big way. We went from 37% to 76% by the end of the day… which is huge! It’s still sort of funny that this wasn’t the result of any PR we have done. Never the less… it’s good to see your hard work pay off.

Today, I am answering questions about international shipping costs. It eludes me how I can only seem to get astronomical quotes outside of the US. =/ It’s like I’m missing something. Angry customers is bad- so I’m doing everything I can to fix this. We are almost to 90% now. I feel lite and giddy. I may have a piece of cheesecake in celebration. As soon as we are funded however, Mark and I are both getting mega steak.

Robot Army : Video Done… sigh…

It’s done. We filmed close to 100gb of video footage and ended up using less than a percent of that. We story boarded, scripted, tried various locations, and in the end chose the most simple three-minute segment that told the bare minimum about our project. It felt the best, flowed naturally, and isn’t so long that you’d stop watching in the middle of it. So I guess we succeeded. Here it is ^

Now that we’re over that hurdle, on to the next headache. In order to launch a project, Kickstarter requires that you have an Amazon business account to transfer money into once you’re funded. This is all well and good. Mark and I got our corporation made, filed for our EIN and were about to get everything underway with Amazon- however for reasons unknown there was a discrepancy with our tax information (or something???) and we got locked out of our account. This is irritating because they wont give us any details why or what we can do to fix it. ::sigh:: So… Mark and I have been in contact with Amazon’s call center in India, which isn’t really all that helpful. We can’t proceed with setting up our business account until this issue is sorted out, so for now we’re at a stand still. I’m hoping this mess doesn’t delay our February 1st launch… but it just might.

cesLP2

Other than that, the end effector got a major upgrade this week. We got our light defuser samples in the mail and they’re quite sharp! Of the two sizes, it looks like the larger, more opaque domes will work perfectly for our kit. This means we’ll be replacing those cylindrical paint containers we jammed packing foam into with these new milky nipples :

photo_2 copy

photo_3

photo_2

All I need to do is tweak the end effector to have holes for the four mounting pegs… SO PLEASED with these.

The stuff that goes inside the lenses also got a makeover. Mark’s tiny PCBs for the SMT LEDs also came in from OSH Park. He couldn’t refrain from adding an easter egg to the back side of the board… which is the reason for their new name. These “F Face” boards are great and will replace the little red through hole tiles I was using for the original six deltas :

photo_1 copy

Mark is in the kitchen right now working on a new demo with the Kinect. We now have six robots working at once (two of the six were out of commission during CES). We also have nine more motors now, which will allow us to make an additional three whenever I get around to finishing the next revision of all the parts. Like I mentioned before, everything is getting tweaked. If it’s at all humanly possible, I’ll have all that ready tomorrow so I can print the new pieces and start assembling the three rev. B deltas so they’re ready before our next demo at Work In Progress. That would put us at 9 robots working in tandem. ::wiggles::

Tuesday is the next meeting for the hardware startup group Mark and I are a part of… and we’re giving a demo as well as announcing our February launch to all the downtown people. Hopefully the skelly tracking is ready before then- and of course, nine robots is better than six, so I will work my butt off to get those made too. Wish us luck!

Oh yeah, join the mailing list if you haven’t already! Show support for world domination with robots here : Robot Army Starter Kit Mailing List

Robot Army : CES Week

This week was exhausting. It involved a lot of walking, chatting, setting up, tearing down, and practicing the good ‘ol elevator pitch. Myself, Mark, and his friend Gregg took off to make the most of CES- exploring for two long days on the showroom floor, and then attending events in the evening. It was a lot of fun and we made some new promising contacts (woo!).

Last night we did our first demo with the six working delta robots we have at Pololu Robotics. They held a nice shindig for those attending the convention who were involved with robotics and hackable electronics. It went over well and our kids did a fantastic job, seeing as it was their first recital. >.< Now to double our numbers… Mommy and Daddy must get busy.

Finally, with a moment to relax, Mark and I went over our BOM and caught up on emails this morning over bloody marries. We also started shooting our Kickstarter video now that I have my voice back! We plan to film discreet segments tomorrow around town, so hopefully by next week we’ll have enough content to edit into something awesome.