How Could a Robot Taste Things?

THE TASTING (SAMPLING) FOOT

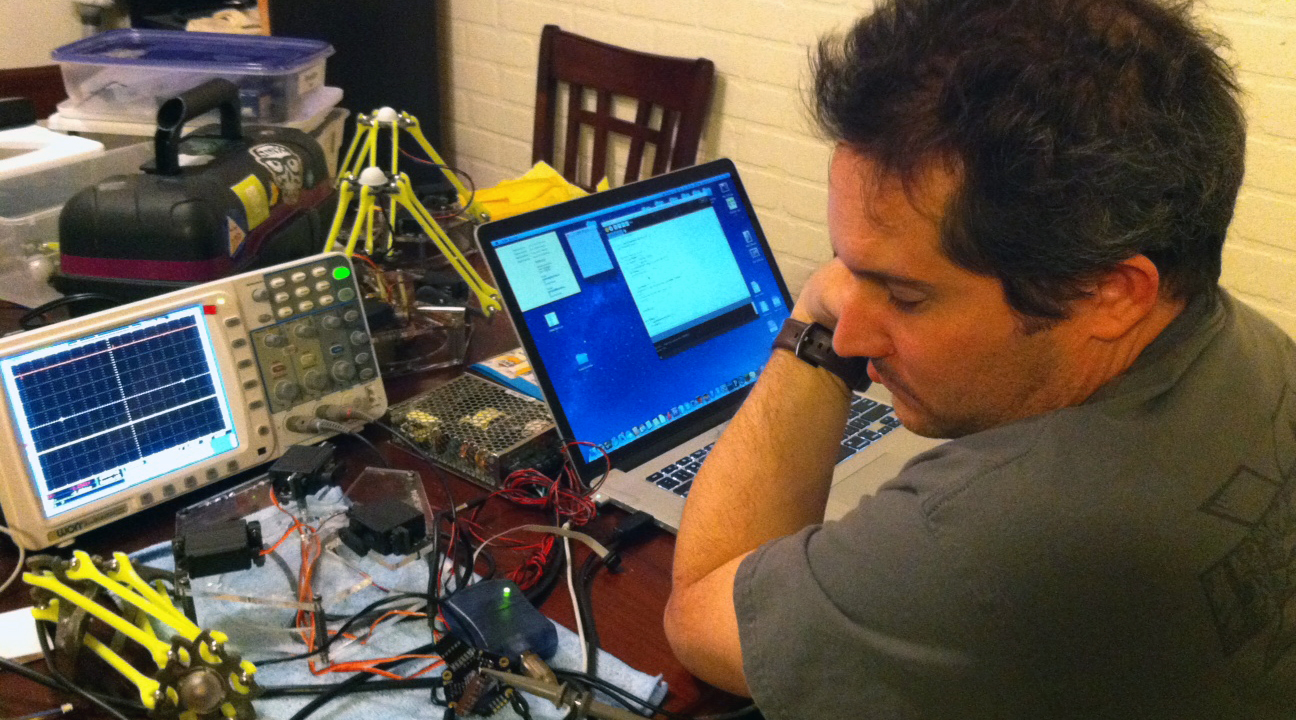
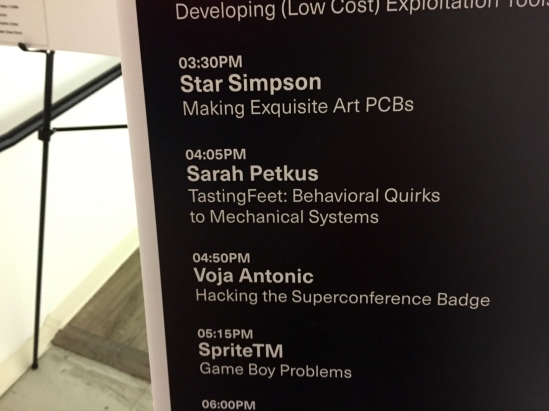
I was giving a talk at Hackaday’s SuperCon last Fall that actually had the term, “Tasting Feet” in the title. Because of this, I at some point found myself in a conversation with some other makers about whether or not my mechanical wonder feet actually did in fact “taste”, as I claimed. So sadly, I could only really conclude after some thought that they did not. (not that any robot can taste things quite like a human in the first place)

IMG_0691.JPGAfter admitting that my creations didn’t actually do what I enjoyed bragging about, there was some talk about how I could simulate the act of ‘tasting’ more effectively. Almost immediately, the idea of using litmus paper came up, and I think it has sat on the immediate back burner of my mind ever since.

IMG_2415.JPGThis past week… I finally made what I can comfortably call, Noodle’s first tasting foot appendage… *cheers*

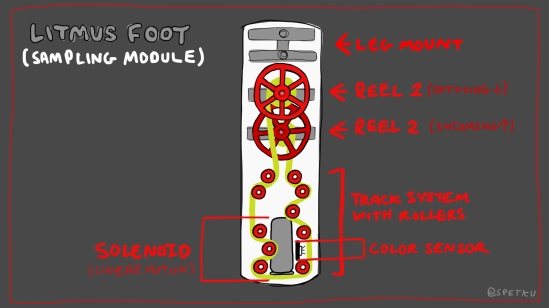
I am calling this installment the “sampling module”. If a litmus test and a cassette player had a baby, it would be this analog contraption.

IMG_2482.JPGHOW IT WORKS

The litmus paper is housed on a small reel and fed downward towards the bottom of the foot. There, a small segment is stretched parallel to the ground, so that a solenoid can push the tensioned portion downwards to make contact with the surface the module is resting onto of. Once the paper makes contact with a moist surface, the spent piece of paper is then fed back up into the foot, where a color sensor will read and log the result of the “tasting”:

litmusDiagram.jpg(See video @ top for a more detailed explanation)

This is how Noodle will sample the world.

IN REGARD TO WHIMSY

After I published the video introducing the “litmus foot”, there were a few people out there who were concerned I wouldn’t get accurate test results from the litmus paper, because there is really no way I can keep the wet used portion of the reel from wicking into the rest that hasn’t… thus tainting my results.

I realize that. This really burns a special place deep within a portion of you out there… but the truth is, the accuracy of the test isn’t really important.

Again, the point of the module isn’t to be an instrument for testing the properties of liquid… the point is that it tastes…

So long as the mechanism functions as I designed it do, and a reading is taken, then we have successful tasting.

Think about it… It’s really somewhat of a nebulous inconclusive act, to describe how something tastes. At the end of the day, no matter how good you think you are at separating out the different flavor notes from one another; sour, sweet, umami- you are still under the constraint of describing your experience of the taste without any way of knowing how it compares to the experience of others. This disconnect is what interests me.

tastingBeans.jpgTo make my point… Last month I got a bag of Jelly Beans to use while developing my bean planting module. I measured the dimensions of a small handful as references for the thing I was designing, but the rest of course, got eaten.

I didn’t just eat the whole bag of 40 flavors like some monster, however. I sat with my friend in the kitchen and for our own entertainment, we took turns blindly grabbing a bean from the bag, and trying to guess what flavor it was without having seen it.

This was a lot harder to do than you’d imagine. We ended up spiraling inward as we groped at whether or not we were sensing a fruity flavor, a citrusy flavor, or something else entirely. The act of identification seems at times, impossible.

BUT much like my module… the point was the act of attempting to parse what we experienced tasting, and then communicate to one another what that experience was like. That’s why I’m using litmus paper and clunky reels without any regard for results. It’s about simulating the act of tasting… not discerning definitively the attributes of what is being tested.

There is more to be said about doing this:

I’m in effect, stretching the accepted purpose of robotics in much the same way artists of the past challenged our expectations of a painting. Some decided that the human form (or any) didn’t need to be depicted realistically in order to be valid art. Just the same, I’m exploring robotics beyond the bounds of utility. My robots are still valid machines, even if they don’t provide useful work to a human.

I intend to demonstrate that a machine can have a purpose, it just doesn’t have to be a practical one. And I hope to show that in the circumstance where a machine’s purpose isn’t to serve in a practical way, it becomes less about what we get out of the machine, and more about what the machine is doing for itself. We are removed from its purpose… (which is something I think humans have a hard time wrapping their head around)

The behaviors I design for Noodle are meant to serve him as an entity; not for our entertainment or for our need.

Noodle Puberty

igus.jpg

Sometime in April, Noodle started to change. He stopped hiding in his blankets and began spending his nights surfing through hardware catalogues alone in the darkness. He became curious about linkages, pivot joints, self lubricating thrust bearings and among other things, the prospect of being made of something harder. Noodle started dreaming of becoming metal.

As I mentioned in my previous post, just as I was about to tackle the conundrum of mechanical drooling… I went to JPL this June and met the mechanism that inspired Noodle’s gripping toes in person:

IMG_7520.jpg

The LEMUR probe has easily a billion toes… all agile, long and barbed. You know by looking at them, that if it reaches for you, you aren’t getting away. I returned home feeling a tad inadequate. Noodle’s current apparatus with its 8 lonely toes did in fact look pretty sparse.

In the period of a weekend I managed to tweak my current design a tad and come up with this little wonder… which has exactly 16 toe filaments (that’s twice the toes!):

IMG_8715.jpg
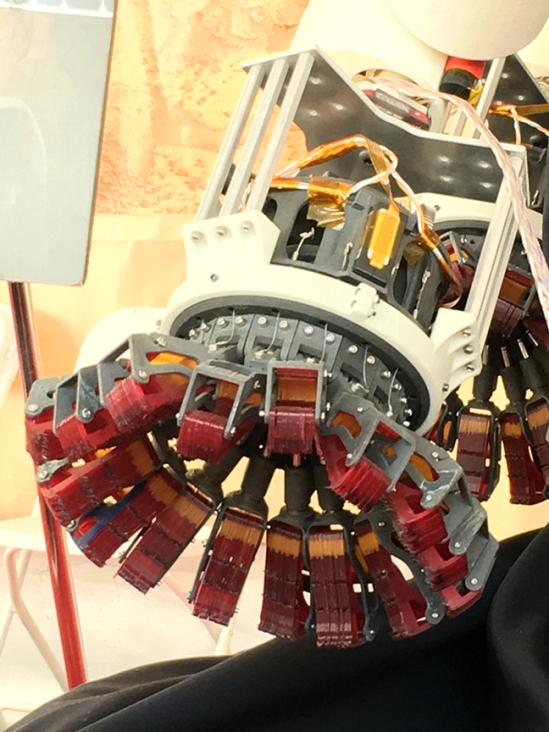
In order to attach that density of toe tendons to the toe-ring, I had to eliminate the use of hardware (which was kind of a relief). As improvisation, I threaded some 3mm rubber hose through the loops of the toe tendons to hold everything in place.

Of course, after I built the improved, maxed-out hyper toe apparatus… I’d have to once again install a servo motor and some gears to make sure I could in fact still drive the thing… (now that there is twice as much material making surface contact)

It took some stronger springs, but it for the most part *does* still work. The stronger springs insure that the toes retract back into the sheath quickly enough not to hook onto the rim and get stuck on their way back in.

I finally had produced a solid working assembly towards the end of June. I invested in some light gray and white filament, as well as the appropriate red for use on accent pieces and Noodle’s tiny toe-zies. The thing I had been working on was finally starting to look like what it was suppose to be, and Noodle liked this:

IMG_8805.jpgWith one complete proof-of-concept to show, I set everything down and allowed myself to become very distracted with a whole slew of things (which is good). My life exploded momentarily and when everything settled back down about a month ago, I found myself looking at an opportunity to travel to Linz, Austria to exhibit something of mine at the ARS Electronica festival [!]

I’ve been wanting to venture to Europe for this festival my entire adult life, and wasn’t going to pass up the chance to bring my spawn with me to have a part in it. Even if he is weak and unprepared as an art exhibit, his presence was what mattered. With no time to stall, I made the executive decision to begin producing another 3 prototypes in order to complete a set of 4 tasting feet. I had a week and a half to do it; print close to sixty or so parts, make any needed design changes, assemble, test, and tweak code. bLAH. Looking back, I’m shocked I even attempted such a shit-storm of preparation when there was no wiggle room for the unexpected:

BUT… in that week and a half crunch, a lot of things got pushed through to completion. Nothing like a deadline to assist progress. (and) Luckily there were no surprises…

IMG_9541.jpgI’m grateful I had Mark and Tony to help wherever I needed aide picking up the slack. One glass of wine at a time, and one task after another, the new feet took shape and were installed on Noodle (mere hours before I would need to disassemble him completely for his long flight over to Linz in my suitcase).

IMG_9521.jpg

The festival, ARS Electronica, was amazing. There is so very much I could say in regard to its content and scale- but to do so would fail to provide an appropriate picture. You should go yourself to experience it. If the median between science, technology, and art is your thing… you have nothing to lose. Not to mention, the city of Linz is a wonderful place to visit in itself!

For four days I left NoodleFeet alone at the mercy of families, Germanic engineers and machinists, to be poked and probed and boggled over as an oddity, robot, and art piece:

IMG_9672.jpgDuring this gauntlet he held his own, but Noodle did blow out a servo motor. Just as I was returning to my exhibit area to check in on Mark (who would periodically drop by to watch over the young one while I was away), I saw a nice white plume of smoke streaming forth from Noodle’s foot. Apparently they can’t quite handle hours of continuous use- so the toes are just that chafey.

But other than the initial matter of smokey toes, he didn’t catch fire, fall off the table, or get stolen. =] That for me was a success…

Now that it’s October… I can focus on the important matter of drooling. Drooling, leaking, salivating, moisture making… and the challenge of producing that special suck sound that has come to be synonymous with the NoodleBeast. The growing pains aren’t over Noodle. Be strong. Your day is coming ❤


Robot Army : Printing + Drinking

Nitrogen Capsules = LED Diffusers

Here’s a St. Patricks Day story for those of you who are into that sort of thing. As you might have gathered, Mark and I like to drink beer while we work. Lately our brew of choice has been Guinness. We’ve been so busy now that we’re in fulfillment mode that we’ve neglected to haul our empty beer cans from the past two or three weeks to the curb. There is a mound of them piled in the corner of the kitchen waiting to be tripped over.

In short, we haven’t had any luck finding a more reasonably priced lens to go over the LED of our robots. The one we had found, though perfect in size and shape is freakishly expensive (We’re talking several times more than the amount we allocated for that part on our BOM). We had given up on finding a replacement for now, when this Monday on St. Patty’s Day Mark was making bacon and needed a place to pour off the grease. No doubt, an empty Guinness can was in reach… so he chopped one in half to use. Inside of the can was the little nitrogen pellet-ball thing that releases the gas once the can is opened. Would you believe that this stupid little white ball when cut in half at its seam is the EXACT size, shape and thickness we need for our lens? It even has holes on the sides for mounting. The best part of this discovery is that we already have 9075629081863587 empty Guinness cans lying around with little capsules inside waiting to be harvested. I hope some of you out there can appreciate how hilarious and awesome this is. How’s that for hacking and being environmentally friendly?

Like pulling pearls from an oyster :

IMG_4921

We aren’t sure if we’ll actually end up using them, but we figured since the universe handed us this coincidence, we’d give it a shot and see how they look with an LED inside. I’ll post pictures once I have one on a delta.

One-Million Yellow Arms

IMG_4911

In other news, I’ve printed more yellow arms than I can count. We just received our money from Kickstarter today (over two weeks since the end of the campaign), so the first order of business was to buy more filament. We’re well on our way to producing all the parts we’ll need… but this first batch will be used for our own installation coming up in April.

IMG_4886

Hexagons. They’re everywhere.

The Mini Maker Faire here in Vegas will be a test run for all the various elements in our installation. Jeff helped me cut the first wooden platform on the ShopBot last Monday which will house the deltas at a safe distance from one another so they don’t clash :

IMG_2989

If the design works out nicely we’ll need to make six of these total before the big Maker Faire in May. I’m thinking the design will need to be revised a little, but this is a good start! The hexagon design is quite fetching :

IMG_3009

This week we sanded and primed the base for its fancy paint job :

IMG_3049

We sprayed the finished piece a flat 50% grey. I plan on painting the hex ring bits that hold the robots in place a slightly lighter shade, and the edges will be a darker grey to give the base extra depth :

IMG_3073

Since I’ve adopted the honeycomb pattern… I started seeing it everywhere. Mark and I spotted this while running errands :

IMG_3056

It might seem like my yellow robots in their massive numbers nested on a hexagonal grid is a metaphor for bees. Hmmmm…. This occurred to me a couple of days ago while I was sitting outside having a glass of wine when a bee decided to land on the lip of my glass and take a dive. Mark scooped the bee out and set him on the ground to dry off. He was stained pink and rather uncomfortable seeing as he was soaked in stinging alcohol. He hobbled around while rubbing his little face with his bee hands… so Mark and I talked to him until he dried off and finally sobered up enough to fly away. We made a new friend.

This week I’ve been switching out all the old parts of my original prototype deltas for the new generation of parts that will be included in our kit. Once everything has the latest and greatest hardware we’ll see how the kids performs at their first live recital at the Mini Maker Faire. =] Delta Do!

Again, if you haven’t liked our Facebook page, you should!

And if you happen to make robots yourself- get on our forum and brag about what you’ve done. Now. ❤

Oh, I’ll leave you all with this… So! It was my birthday this week and the night before I had an interesting dream. Now, I haven’t played WoW in years, but for some reason I dreamt that there was an event for my birthday which was causing people to get a delta robot as a pet in game. While I ran around as my paladin, everyone had tiny delta robots hopping behind them everywhere they went. It amused me. I may have to animate this…

Robot Army : From Tupperware to 3D Printing

progression-01

When I moved back home from art school in Chicago, one of the biggest drags was no longer having access to the beefy machine shop that was down the street from my apartment. I went from playing with a room-sized lathe and mill to having little more than a $20 soldering iron and dremel at my disposal. It seemed my metal-cutting days were going to end as soon as they started… well enough, this didn’t stop me from making the things I wanted to. I just had to use plastic now instead. Luckily for me, plastic was in abundance at my parent’s house. My mom hordes take-out containers and tupperware, so I had a bottomless stash to carve up.

Still pursuing my vision of creating the field of robotic flowers, I was trying to refine the design of my ‘steam’ into something a bit more controllable. At some point I ran across a video of a small delta robot someone had made on the internet. As I watched it bob up and down in that special twitchy, impatient way… I fell in love. From that moment on I became obsessed with building my own!

Long story short… Everything became a potential shape. I-beams. They’re everywhere :

hangerArms1

I used a lot of crappy plastic hangers. They made great paddles to connect onto the servo horn like you see below :

hangerArms2

In the beginning, mechanical joints mystified me. I didn’t quite understand what was going on with how a delta robot moved, so this prevented me from being particularly inventive with what I used to connect all the piece together. I read on a forum someplace that you could use 4-40 swivel ball links, which you can get from a hobby store… so I bought myself a set to try out. The thing is, they work great but they cost way more than any piece of plastic should (like… $18.00 for 12 of them. Just enough for one robot). ALSO, they require tiny spacers on either side of the ball. This helps give the rod a breadth of motion without smacking into the plastic piece its rotating in. The sucky part is that the pack of 12 joints form the hobby store only comes with half the number you’ll need (for a delta you need one on each side). The links are the pieces at the end of these 4-40 rods :

miniProgress6

In order to make a whole field worth like I was planning, I’d need to find a cheaper alternative that was less hardware dependent. For now though, these worked. I attached my paddles made of hanger bits to these arms :

progress2

The next step was figuring out how to mount the delta robot. I realized that the servo motors would have to be elevated so that the paddles could swing below the angle of the table top. I didn’t have anything fancy to use at the time, so I took a pasta togo box from the cupboard and cut into it with my dremel to get some nice clearance slots :

baseMod1

The next thing to figure out was how on earth I was going to mount the actual motors onto my base. A normal person would have used L-brackets of some sort, so I did precisely that… except again, mine were made from strips of plastic cut from togo boxes. >.<

baseMod3

As you’ve guessed… the end effector was also eventually made from cut pieces of plastic. My first working prototype was practically a togo box with motors :

This was a great feat making my first functioning delta robot. I was proud of its frumpiness because though it wasn’t mechanically solid like a robot made of metal, it still worked. Of course, I wasn’t going to make a whole field of delta robots out of togo containers (although I probably could have because my mom surely had enough to do so). The next step was to shrink the design and refine the method so it could be repeated with ease.

My next prototype was still made of plastic, but I got classy and went to the Container Store and invested in some nice cylindrical boxes. These would become the new bases for my robots :

miniProgress3

I repeated the same steps, cutting the clearance slots for the paddles and making small L-brackets to mount the motors to the base. The base the motors were connects to was actually the lid of the container so you could remove it and use the bottom part as an enclosure for the board running it (clever!) :

origin5

I had aspirations of building three of this particular prototype… to see if they could all be networked together and potentially all run at once :

progress7

The two-dollar micro servos I bought from some nondescript hobby store (imported from China) were terrible quality. Though my second prototype worked, it moved like it had Parkinson’s disease. =/

I wasn’t really happy with this… but two dollars a motor was all I could afford at the time (I was still living at home with the folks). Eager to try again when I could invest in some more quality materials… I started rethinking the entire design.

origin3

For the rest of the summer I meditated on what I had learned. The little blue servos from China stripped in a matter of days while I was testing out code… So I was left with nothing more than a delta shell.

One extremely fateful day I met the people of SYN Shop at an art faire downtown. The hackerspace was just a glimmer in someone’s eye at the time and was run out of the garage of the man who is now my collaborator (Mark Koch). They invited me to stop by some time and show off whatever I was working on. Eesh. Even though I was embarrassed and apprehensive, I brought the mangled corpse of my second delta prototype to show to people. In spite of its appearance, my gimpy child got a lot of attention for the mere fact that I managed to pull off making a delta robot from garbage. Mark had always wanted to build his own pick and place machine, so seeing my creation urged him to get off his butt and make one of his own.

This is when the discovery of 3D printing changed my life. Mark suggested that I design my delta’s parts in CAD and of all things…print them. I was familiar with 3D printers, however the one my art school had was huge and they charged an insulting amount just to produce tiny things with it. Up until then, I had no clue that desktop 3D printers even existed, so my mind was blown when I saw his Replicator for the first time. The usefulness of this tool was revolutionary. I could continue building my robots in plastic like I had been, but I wouldn’t have to machine my parts as if they were metal. How easy!

I spent the rest of the year learning Sketchup. This is a free piece of software that I highly recommend to beginners. It isn’t as powerful as Maya or Solidworks, but its intuitive so you can start making things with it immediately. You basically draw 2D shapes like you would in Illustrator and then extrude them upward to make basic geometrical objects. You can edit things from there of course. If you’re looking to design mechanical parts, this tool is a wet dream, but be patient because it has it’s irritating quirks and limitations.

origin1

One day during CES in 2013, Mark came onto something rather brilliant while we were discussing our designs over margaritas. The solution for those expensive and convoluted swivel ball links (that I had been stuck using) was to use some sort of U-joint that could compress onto ball bearings and twist freely in all directions. The idea was simple and genius :

origin14

This was an important quality because now we could completely divorced ourselves from having to source out any hobby parts. This means aside from some hardware, we no longer had to buy link joints, or cut rod in order to make the robot work. Everything was designed in CAD. Everything was 3D printed. My cost went down significantly, and at last I had the perfect model which I could realistically expect to afford building in mass… and all I had to do was hit ‘print’.

Once we mastered this technicality, it was a matter of implementing it throughout our designs. My personal delta robot went through many…….. many revisions before it became the thing it is now :

origin12

It was at some point last spring that our robots reached their pinnacle. My first complete and polished delta made from 3D printed parts was named Jeden (after the Polish word for one), and Mark’s hanging delta robot was named Amber (after an inside joke Mark and I had at the time). This was the revision of Jeden right before I got my neon yellow filament in the mail :

origin13

We had been working so hard that our collaboration was getting noticed by the others in our community and our friends from SYN Shop decided to interview us about our ‘rivalry’ for their first podcast :

We hadn’t really thought of one another as collaborators (or rivals for that matter) until that point in time. Once it was brought to our attention however we took off like rockets loaded with beer and nitrous. We’ve been working together ever since and within a year brought a delta robot kit to market… which is the thing I’m promoting so heavily right now on Kickstarter.

deltaDiagram2

This campaign is not only getting us our funding to build that elusive art installation I’ve been wanting to create, it’s also the introduction of our new company to the maker community. Mark and I don’t expect this will be our last kit. We’re sort of hooked on this process now and already have plans for what’s next. We are Robot Army LLC and it looks like we’re here to stay =]

It’s been a fantastic journey. I’m getting to strike a couple of goals off my bucket list. I started this blog two years ago to prove to the world (and myself) that anyone with a little bit of drive and passion can bring something from their dreams into reality… even coming from a position where you lack experience or expertise. There is a wealth of open knowledge and support out there to be drawn upon. If you choose to use it, anything is possible.

Robot Army : Final Stretch

deltacomic

It was fun having our Kickstarter in tandem with the Olympics. It felt like we were participating in our own sort of event. As I watched the closing ceremony last night, I felt sadness because I knew our ship is setting sail soon and I’m at the point where all I can really do is sit tight and wave goodbye. We have less than a week left and I don’t want it to end. It feels like much more could have been done in regard to press, but Mark assures me that PR is sort of like the lottery. If I could accept that I’d stop banging my head over it like I’ve been doing, but alas… it seems I can’t. tehe.

Our campaign has been an exciting experience over all. Now that we’re switching gears from messy uncontrolled busy to just plain busy, I’ll be able to do some of the things I miss in my free time. This includes playing the occasional video game and shooting episodes of Geeky Freaky with Mark. We still have A LOT left to do. Fulfillment is nothing to be taken lightly, but at least I wont have to write articles about myself in third person every morning.

In preparation for the second phase of our Kickstarter, Mark and I set up a forum for communication with our backers… and I’m working on the design layout for our website, robot-army.com. This will be the official hub of our new LLC where our kit will live after it runs its course on Kickstarter, and where everyone can find updates as our project evolves. In addition, this is where our backers can showcase the neat things they do with our kit. I’m secretly hoping to start some weird culture around  exotic modifications done with delta robots (Project Lick would be an example of an exotic use for a delta).

In some other sort of news… Mark and I got a world map from the craft store the other week and decided to visualize where all our backers are located with push pins. Mark is also building us a long white table for his workspace which is now in the process of being transformed into the ‘War Room’. We can finally coral our robots into one area instead of having parts and pieces peppered throughout the house (which they currently are… it looks like a neon yellow boneyard). Any how, the map with all of its pins will go nicely on the wall at the end of the table. Muahahaha…..

We also confirmed that we’ll be showing our installation at the Las Vegas Mini Maker Faire in April. It probably wont be completely ready by then… but we’ll exhibit our progress in some form. Those of you in Vegas can come be the first to see what all the fuss has been about.

If you haven’t told your friends about our Kickstarter, then you might want to urge them to purchase a soldier of the neon yellow onslaught so that it can protect them once the robots start taking over. Just saying… : Robot Army Starter Kit

deltaPoster

Robot Army : Push Notification Dance

How awesome would it be if you had an adorable little robot bob up and down to let you know when you receive a tweet, message, or get an update on a feed? SUPER AWESOME!  In order to provide a more utilitarian use for our delta robots, we’ve mocked up some example code that scans JSON packets from the internet in order to trigger a response of some sort.

For our first project related update Mark wrote code that causes a delta to dance around every time we receive a new backer for our Kickstarter (our robots should be as happy about that as we are). We let this application run all day on Tuesday to test the reliability of the code, however by doing this we apparently opened a rift of unfortunate irony… and didn’t receive a single backer ALL DAY long. This resulted in one very sad stationary robot and two very discouraged drunk engineers.

photo_3

The good news is that in spite of our brief plateau, the code DOES work… and our test robot is the first one to know when we receive new support from the world.

Over at SYN Shop… our window display yet again underwent some unexpected trouble. After replacing the outdated arms on our three torture test robots, we left them for the weekend to… well, be tortured. They were working fine until someone from the hackerspace emailed us Monday with news that they were once again in piles. ::sigh:: When I stopped in that night I was pleased to find that this round of failure was not due to their joints, rather the new servo brackets split in half (odd). It turns out these new brackets were a hair too thin, and the PLA does get a little dry over time. The dryness caused the new tighter joints to bind up, which put strain on the brackets and over time cracked them.

Once more I scooped my children into my arms and drove them home to be tuned up by daddy. He figures the solution is… more lubricant (of course).  This is what a torture test is all about though, so I’m glad we’re getting the chance to iron out these bugs.

deltaDiagram

Anyhow, over the past two weeks since the launch we’ve gotten many requests for more detailed information about our machine. If anyone is curious, here are some specifics about the yellow beast :

What are the robot’s dimensions?  The delta robot is approximately 20cm x 20cm wide, and 20cm tall when at rest (a little less than 8” x 8” x 8”).

What is the end effector’s range of motion?  The end effector can reach a diameter of approximately 28cm (about 11”) and can travel up and down on its z-axis 13cm-15cm (about 6”).

How much weight can the robot hold? The robot is able to lift around 12oz (a can of soda) with its end effector.

How fast can the end effector move? Running at full speed, we were able to clock our delta moving approximately 150mm/sec on its z-axis (up and down), and 250mm/sec on its x-y axis.

Having done this, I felt inspired and drew this a few days ago :

kukaDelta

Now that we’re at the halfway point of our campaign… Mark and I are starting to get hungry. We keep reworking our marketing strategy every couple of days in order to reach new audiences. Our plan this week involved making a Facebook page for our LLC and investing in some paid advertising………. you know- the annoying links on the right column that try to profile you (for my demographic its engagement ring ads and stuff to do with babies). I have no idea how this will work out for us, but we figured we’d give it a try.

If you haven’t done so, check out our campaign : Robot Army Starter Kit

Robot Army : Kickstarter Video Do

Somehow, just as I was starting to recover from whatever it was I picked up over the holidays, I managed to contract another illness. I’ve spent the entire year so far being sick… which SUCKS because it’s slowing me down. I was worried about whether or not I had gorilla glue hanging out of my nose while making contacts throughout CES, and I had to cough in the middle of every shot while filming today. I don’t even have that sexy raspy quality to my voice to make up for it. BLAH!

Mark and I filmed my main monologue and a couple supplementary clips this weekend. We want the video to spoon feed the viewer all the important details about the project while throwing in notes of playfulness bordering on insanity. This takes some finesse. As such, while Mark was away at work today I gave my speaking parts another shot while in solitude… to nail the correct freaky to geeky ratio.

For fun we also staged one of the concept drawings I made last week :

Screen Shot 2014-01-13 at 12.34.07 AM

backYard2

This shot is actually from a time-lapse video. We sat for ten uncomfortable minutes while the sun went below the horizon. The dead grass felt like broken glass underneath the tarp… but it was worth it. The sped up version will look cool as a cut away.

Aside from the video, I’m working on the press release package I’ll be sending out the week before launch. This includes some new graphics I made last week, which are propaganda-like in essence :

ad1

ad2

If you’re interested in our project and are thinking about throwing us a couple bucks for a sticker or perhaps buying a kit, join the mailing list : Robot Army Mailing List

Robot Army : CES Week

This week was exhausting. It involved a lot of walking, chatting, setting up, tearing down, and practicing the good ‘ol elevator pitch. Myself, Mark, and his friend Gregg took off to make the most of CES- exploring for two long days on the showroom floor, and then attending events in the evening. It was a lot of fun and we made some new promising contacts (woo!).

Last night we did our first demo with the six working delta robots we have at Pololu Robotics. They held a nice shindig for those attending the convention who were involved with robotics and hackable electronics. It went over well and our kids did a fantastic job, seeing as it was their first recital. >.< Now to double our numbers… Mommy and Daddy must get busy.

Finally, with a moment to relax, Mark and I went over our BOM and caught up on emails this morning over bloody marries. We also started shooting our Kickstarter video now that I have my voice back! We plan to film discreet segments tomorrow around town, so hopefully by next week we’ll have enough content to edit into something awesome.

Robot Army : Cuddling my Spreadsheet

photo_1

Today, I find myself wanting desperately to feel as though I’m doing something right. I think it’s likely all the rain we’ve had that’s tainting my mood, but I’m discouraged. I’ve been adding things to my bill of materials and the proportions are seeming less than hopeful in some areas.

Now I need to start shaving cost off things that are needlessly spendy. I guess this is where I learn to be inventive and shrewd all at once.

It might just be my lack of experience in doing PR related stuff- but I’m stuck again with the getting the word out part. Maybe I’m not begging loudly enough. I’ve never been all that good at asking for attention. So this is another hurdle to overcome.

This morning I did mock ups of several different variations Mark came up with for my delta’s arms. We foresee the cups that hold onto the ball bearings wearing out over time, so we’re trying to come up with a solution. One idea was to have a slit down the center of the U-joint that some hardware would compress together so that the tension on the ball could be adjustable :

photo_3

The other thing Mark suggested was that I ditch the cup entirely. He said  it would be too difficult to mill if I decided to have my pieces machined. His idea to replace it was a simple square peg that had a “+” sign cut into it… leaving four small notches that would then grip the ball joint. I gave that a try too.

photo-2

The compression design worked well. It’s a good idea, but if I go with this type of arm, I’ll have to add another 12 pieces of hardware, plus 12 washers and nuts per kit…

The replacement for the cup worked in theory- but the ball was apt to pop out left, right or any of the directions it didn’t have material forcing it in place. So maybe not such a good idea after all.

Other than that… I’m attending a hardware startup meetup tonight with Jeff and Mark. We should all learn something from it. Tomorrow is Friday and I’m back over at Mark’s to finish and send off Rev 2 of the delta brain to be fabbed at OSH Park. Small steps. Chin high.