

You know those cool images that become 3D when you put on the spiffy red and cyan glasses? This weekend I accidentally learned how to make them! They’re actually ridiculously simple to create… and extremely fun to layout once you get the hang of it!
I was adding the finishing touches to the next page of my webcomic. The subject needed to appear “glitchy” so I decided to mess with the registration of the RGB channels. Sure enough, this produced the appropriate effect I was going for.

By shifting the channel registers, I was trying to produce an anaglyph style, but I had no intention of the effect actually working. After all, I assumed those nifty dizzying images were hard as hell to make.
Out of our shared desire to figure out how things work, Mark dug up a pair of 3D glasses and we started fussing with the channel layers. As I shifted the channels to the left and right, I was able to make the panels retract and extend from the foreground. Eureka.
So I did a little bit of homework on the subject (which I’m surprised I’ve never done in the past). It turns out that with the help of Photoshop, it’s quite easy to create your own 3D anaglyphs. You just need to plan what it is you want your image to do.
Here’s How
FIRST and foremost, you’ll need an image editing program like Photoshop, and a pair of anaglyph shades.
Start thinking about how many levels of depth you want your image to have. You’ll also want to decide what parts will recede from the foreground and what you want to pop out at you.
For my example, I’m going to use this sketch of Noodle with his lint:

Foreground: His feet will pop out the most, sitting over his pile of lint
Middle-ground: the lint pile will be slightly under his feet
Background: the rest of his body will set slightly behind the pile
Each level of depth should be completely separate from the others. In other words, if you use many layers in Photoshop to create your image, just make sure none are shared between your levels. I separated all of my assets into folders to make sure this didn’t happen (and to make the process less confusing!) You can see the folders for my three levels of depth below:

Now with the foreground level at the top of your list and the background level at the bottom, go ahead and make a copy of each level. Add the tag “RED” to one and “CYAN” to the other:

Tweaking the channels
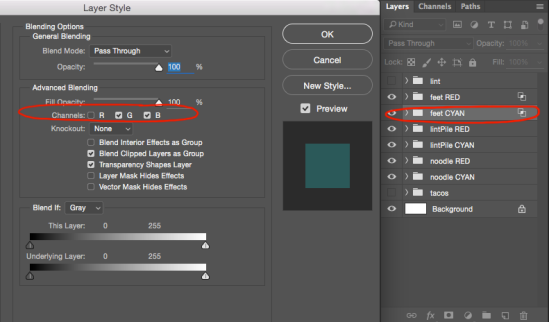
Open the layer options for each. If you’ve selected the copy which you’ve tagged “RED”, you’re going to want to uncheck the “blue” and “green” channel like this:

Do the opposite for your “CYAN” layer:
Shifting the Register
The way you’re able to achieve the illusion of depth is by tricking your eyes into converging where you want them to with the magical glasses. In short, the farther the red and cyan channels are from one another, the more 3D they appear. Whether they retract back or pop out at you depends on which direction the colors are shifted from one another:

(NOTE: In the image above it appears that the colors are doing the opposite of what the text says. This is because the color channels will visually appear opposite of what they are)
Choosing Your Levels of Depth
For Noodle’s body (my background), I’ll select the move tool and nudge the CYAN channel twice to the LEFT, and the RED channel twice to the RIGHT:

For the middle ground, I’ll nudge the CYAN channel 5 to the LEFT, and the RED channel 5 to the right. Lastly, for Noodle’s feet in the foreground, I’ll move the red and cyan channels the furthest apart, at 8 strokes in either direction:

That is all there is to it. Crazy easy, huh??
Further Show Boating
I went ahead and drew an additional pile of lint and added it above the foreground over noodles feet for EXTREME depth. The cyan channel was moved ten hits to the left, and the red was moved ten to the right:

Lets not leave the background begging. I splayed some empty taco wrappers in Noodle’s wake (all robots love tacos). To put these BEHIND noodle, I nudged the CYAN channel to the RIGHT (not the left this time) four or so taps, and the RED channel to the LEFT:

You should see five separate levels, like a paper diorama or shadow box.
It’s completely up to you how your levels are parsed, so have fun with it! I will usually keep my glasses on and watch as I shift the channels to figure out what looks best.
From here, there are some fancier things you can do with the color channels to create angle effects, and even give your object sculptural dimension… but I haven’t figured out how yet. When I do I’ll surely share. Until then, expect to see some interesting anaglyph panels in my comic pages… because things are better in 3D.

