

We probably shouldn’t have taken on this side project amidst all the pressure to prepare on time for our display at Maker Faire, however I’m glad we have this awesome life relic to show for it!
Since my last update, I took the four complete 3D printed stones and gave their surface a rather sharp makeover. All those years in art school came in handy again. It surprises me just how many techies have never heard of gesso … so I’m tapping this apparent art secret for the sake of painting on an otherwise stubborn surface. ABS will take acrylic paint, however instead of priming it with anything you might get from Home Depot in the paint section… you can go to Blick and grab a pint of clear gesso (canvas primer). It may be a little more expensive, but it’s less volatile, doesn’t have any fumes, and has the best tooth when it dries for painting on… you’ll be thankful you spent the extra money.
So, I gessoed my rocks… and painted them over with a nice solid undercoat of dark muddy brown. The lighter color was dry brushed on top with a healthy amount of baby powder added to the paint to give it a matte, chunky appearance when it dried. The final texture is pretty sharp :


After they were polished up, it was time to get them ready to fulfill their purpose. We ended up using an old revision of the board we designed for our delta robot Kickstarter kit as the brain to drive the LEDs and servos. They have an ATMega 328 on board, so we used the Arduino platform to upload our code onto them (This is Rev A of our delta brain from last year) :

Since there is only one input for a single RGB LED we had to make some Y cables so that all three LEDs could be powered in parallel :

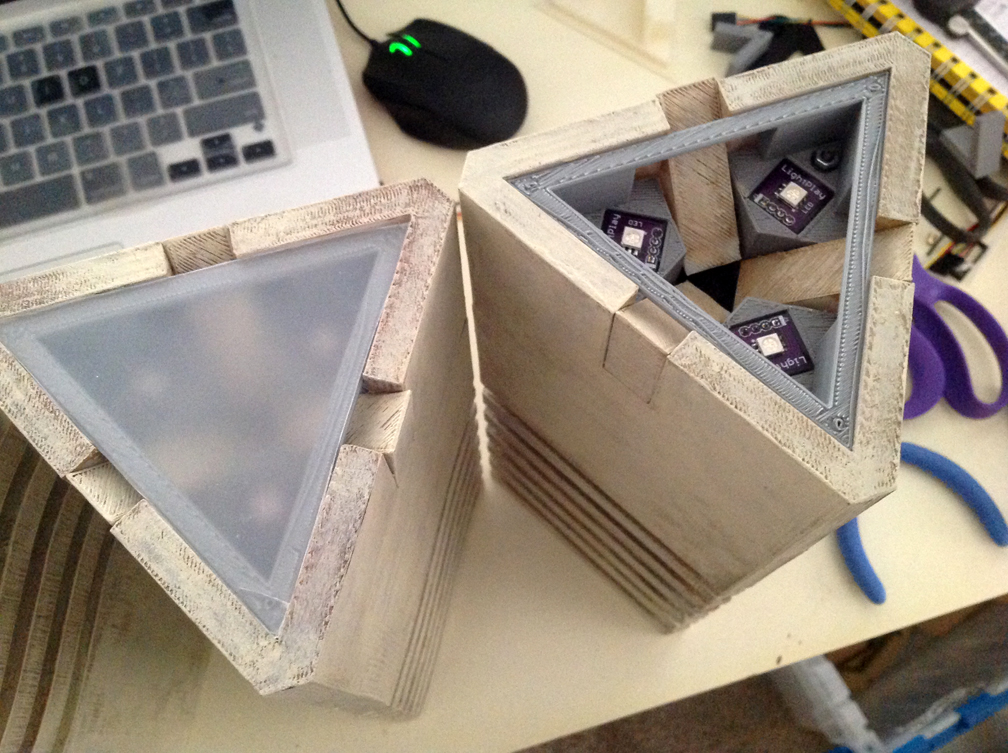
guts splayed out :

Also, the easiest and best way I’ve found to make excellent light diffusers is to go to the Container Store (or some place that has lots of plastic boxes for cheep) and buy something that has a frosted appearance. I found some boxes for under a dollar a piece with perfectly flat lids that I cut triangles into for the tops of these stones :

Here is what the LED tiles inside look like again :

Mark got some basic code on the brains to make them do :
As soon as they were ready we rushed to the living room and set up an altar around the sofa! It was late, but we wanted to test out how they worked as ‘mood lights’. Mark programmed the LEDs to pulse slowly… which was a cool effect because the overall color ambiance of the room would shift slightly as they all faded in and out at random intervals. I am pleased to report they definitely serve their purpose well! Right now each is powered with their own wall wart, but once we switch those out with battery packs they will become permanent fixtures in the living room!
Just add love…


So… I’d call the mood lighting project a success, however like all projects there are some things we learned along the way and would improve if we had to do it all over…
Here is what we’d do better :
Mark and I plan on making the STLs for these available on our website so that anyone can potentially use up an entire role of filament and make their own set of stones too! Before we do that, we want to optimize the design so that they can be printed in fewer pieces giving them a more seamless appearance in the end. The top portion needs to be removable so that the mechanical bits can be installed, so we’ll explore a more aesthetically pleasing way to achieve both in the future.
The wedge pieces are a tad too snug in their slots now that they’re painted. As such, the little servos we used don’t have quite enough torque to push them out like they need to… so we’ll tweak that as well.
The segments of our next revision should lock together somehow, eliminating the need for foam core inside as structural support.
I think other than some minor tweaks in proportion, that’s it. If you do want to print your own, the natural color filament really did work out nicely when painted over. Do keep in mind that we used up an entire role for the first three stones (and we printed on the lowest setting with 10% infill!) >.<
In addition… we want to have the stones active with sensors (instead of an on and off switch) so that they can truly be as theatrical as in the movie. We were thinking of using a collection off different types to detect an approximation of their corresponding element (you know… it would be unwise to set the fire stone on fire and all). We’re open to suggestions! Right now we’re pondering on anything from moisture seniors, photo resistors, pressor sensors, and those nifty magnetic sensors… =D
I think tonight we’ll watch the Fifth Element amidst our new life saving, light-giving stones of glowing awesomeness… I’ve seen the movie 409567209384760587217348 times, but it’ll feel a bit cooler now because I have this sense of ownership that I didn’t before. =]
Thanks for following our project! Show us yours if you decide to make them. We’d love to see improvements to our design!
Back to pooping out delta robots,
-Sarah & Mark

I love it. Great job girl & guy.
Pingback: (Fifth) Elemental Mood Lighting SciFi Replica Project #3DxRobotics #3DThursday #3DPrinting « adafruit industries blog
I *love* this, did you ever make the STL files available? My fiancee is a HUGE TFE fan, and this would be a great project with my new printer.
Couldn’t find the files posted anywhere, thought I’d ask.
Thanks,
James
James,
You know what, we didn’t ever post them anywhere and I feel like a jerk for forgetting. We had the intention of improving the STLs in a second revision and then posting those, but we dropped the project. =[ I will talk to Mark about making the original files available and let you know when we do.
I’m glad you like them though, the fifth element is my second favorite movie of all time… next to blade runner… 😉
-Sarah
Ah, it happens. My own site is full of dropped projects >_<
I've found a couple of other models, but I like the flip-out bits you guys put into them, a nice little detail.
No rush, I only just got the printer and am still working out all the kinks.
Blade Runner… think I might print up a spinner for the desk.
I too would be interested in the STL files. I’m feeling ambitious.
There is no word to describe exactly how cool this is. I applaud you two for the hard work you put into these. I was merely looking for an STL for these solid so I could 3D print them with a 0 infill after adapting them to accept a tealight on top. This is way cooler. Thank you for sharing these with us.
This is like the coolest thing i have ever seen!!
If you have the STL files and any instructions/guidance i would love to Give this a go!!
Thanks
Dave
Hey guys, it’s really great. I need to design a 5’th element garden for my client. I need these stones 😀 I would like to ask you if it’s a possibility to buy the stones? Woud you be able maybe to design the outdoor version? It would be for a garden of a budhist centre in Prague… Thank you. Lada
Lada36@seznam.cz